Neon || 2018 Flip List Item No.7

Guys!  I made a thing.  Well technically I made two.  Besides a new dresser, I've got another 2018 Flip List item to reveal:

 
List.jpg
 

Item No.7: Experiment with Neon

DSC03734.jpg

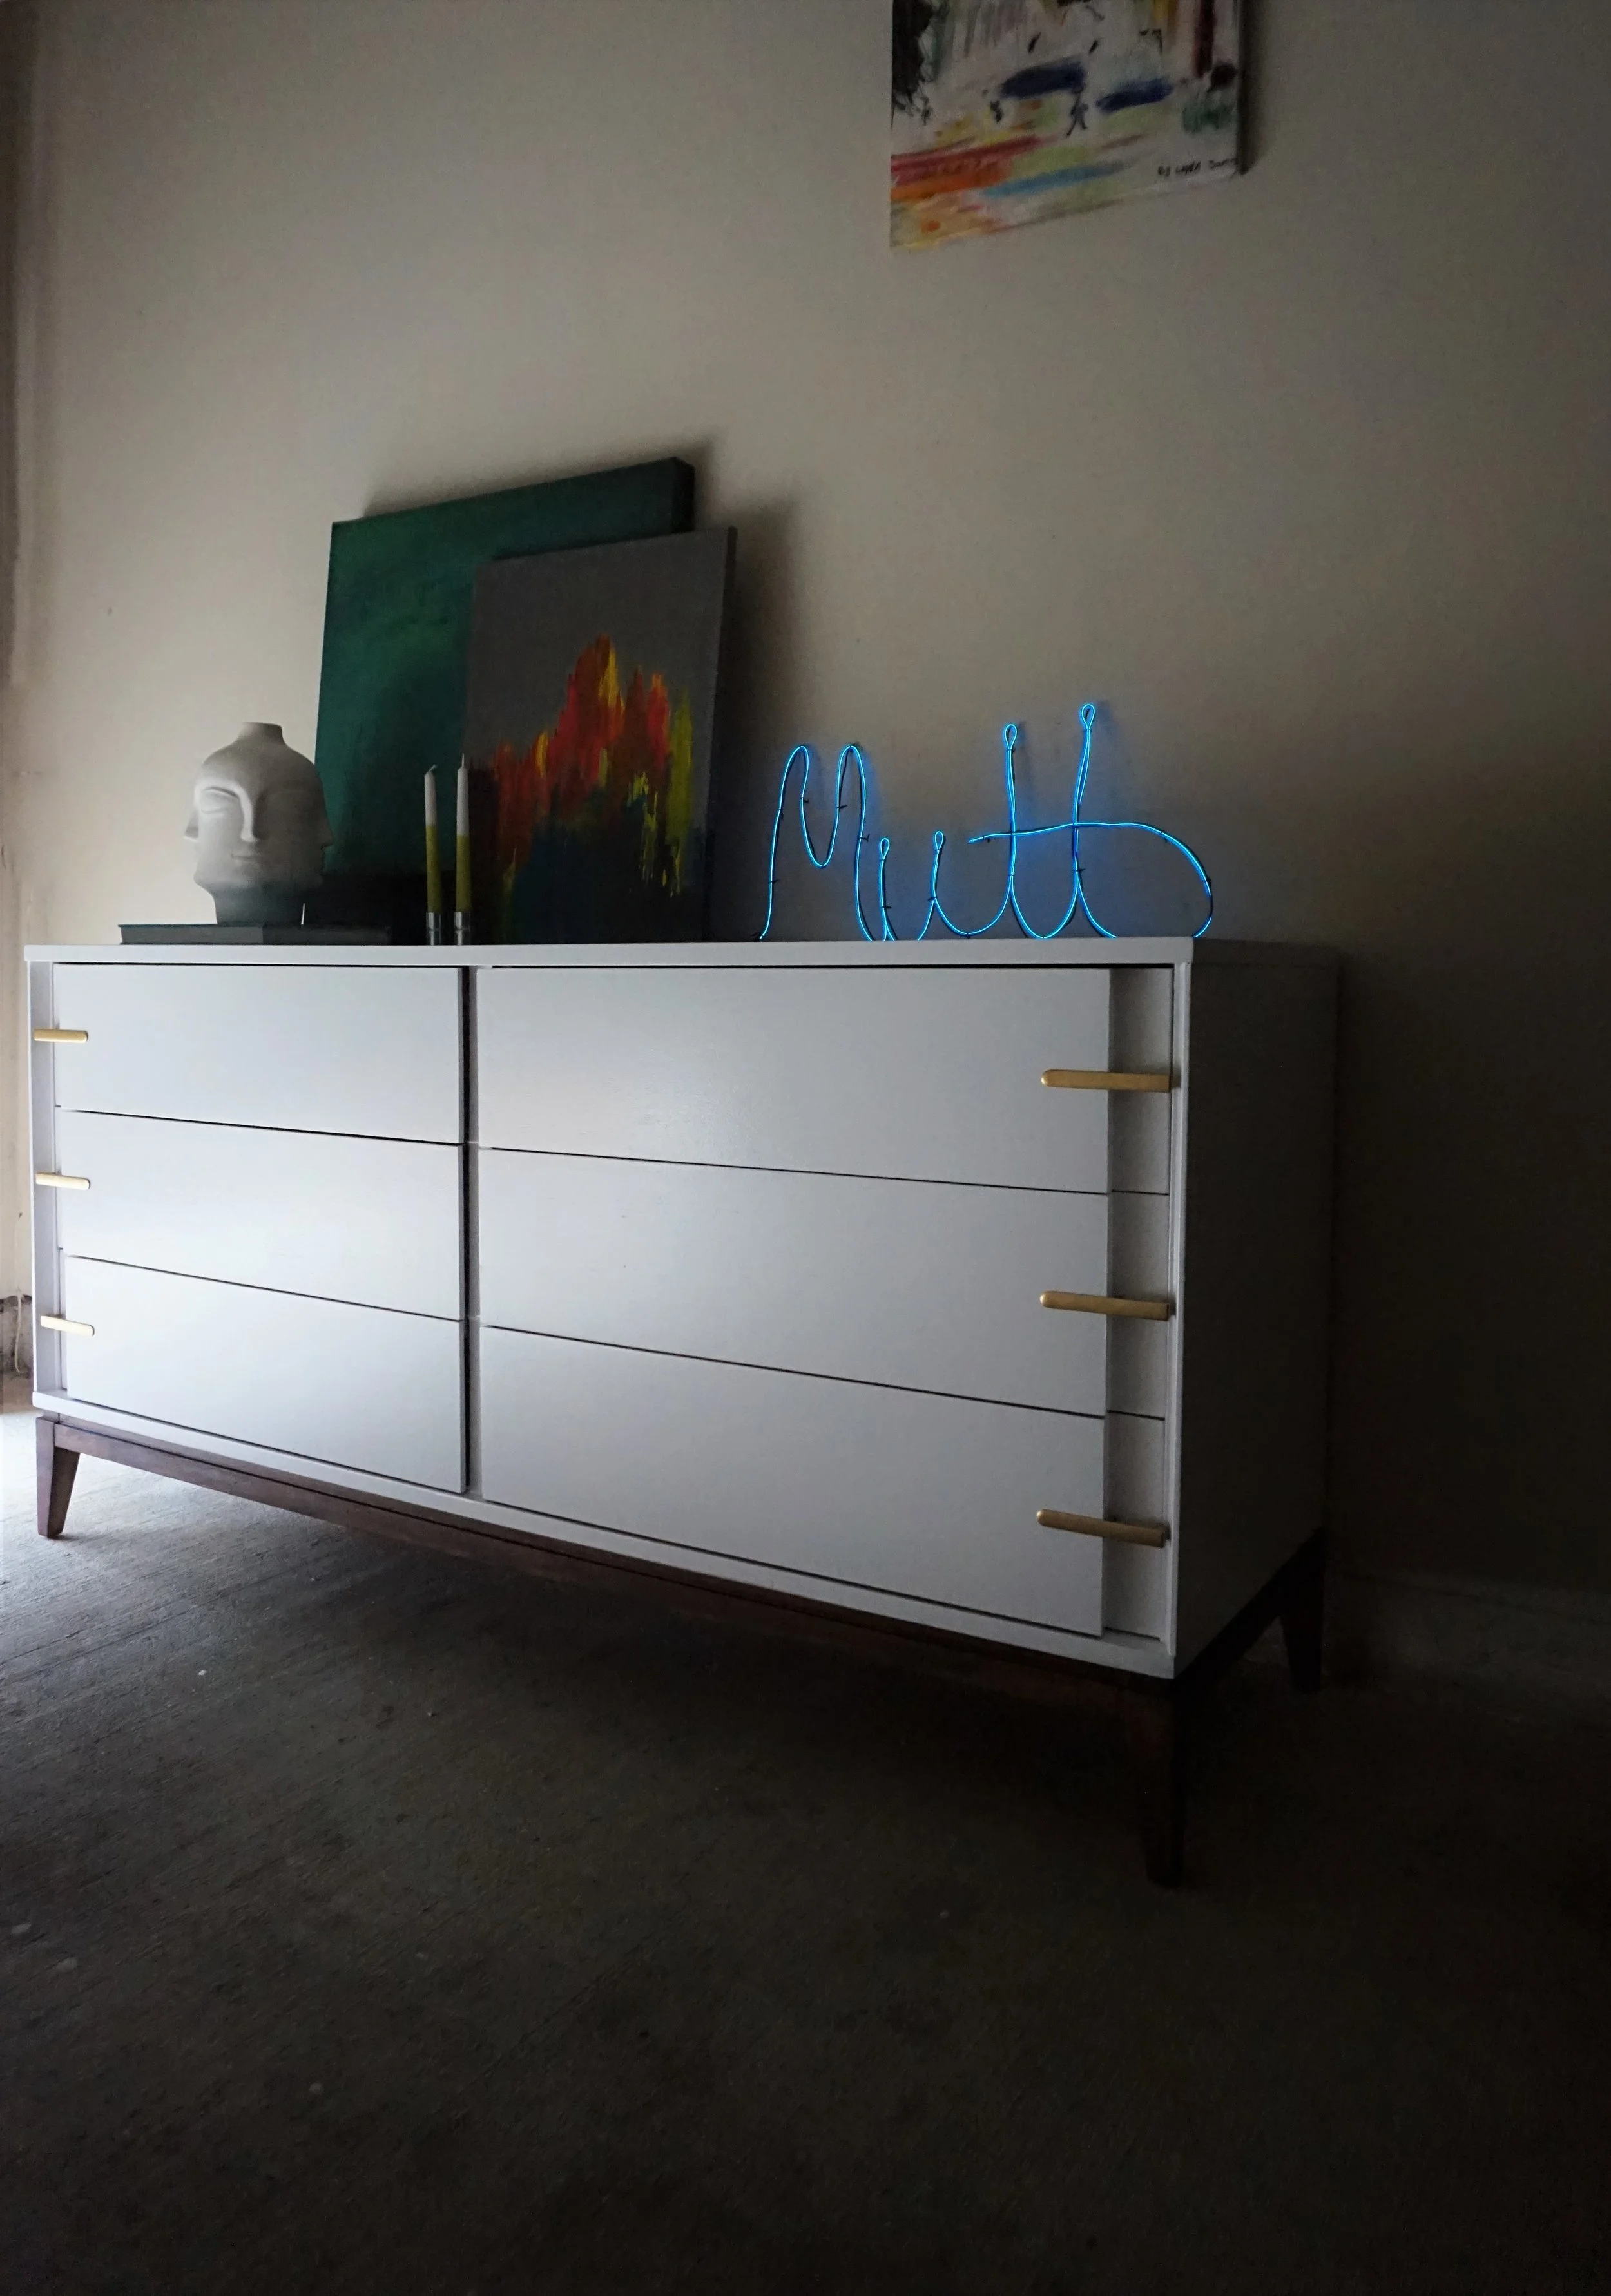
You were expecting me to do a neon paint treatment werentcha?  Well I'm not ruling that out just yet, but when I set this goal in mind I actually really wanted to DIY a neon sign.

DSC03746.jpg

I started researching my options and I found out there are actual kits for the stuff!  I decided to order this super affordable one from Urban Outfitters.

DSC03721.jpg

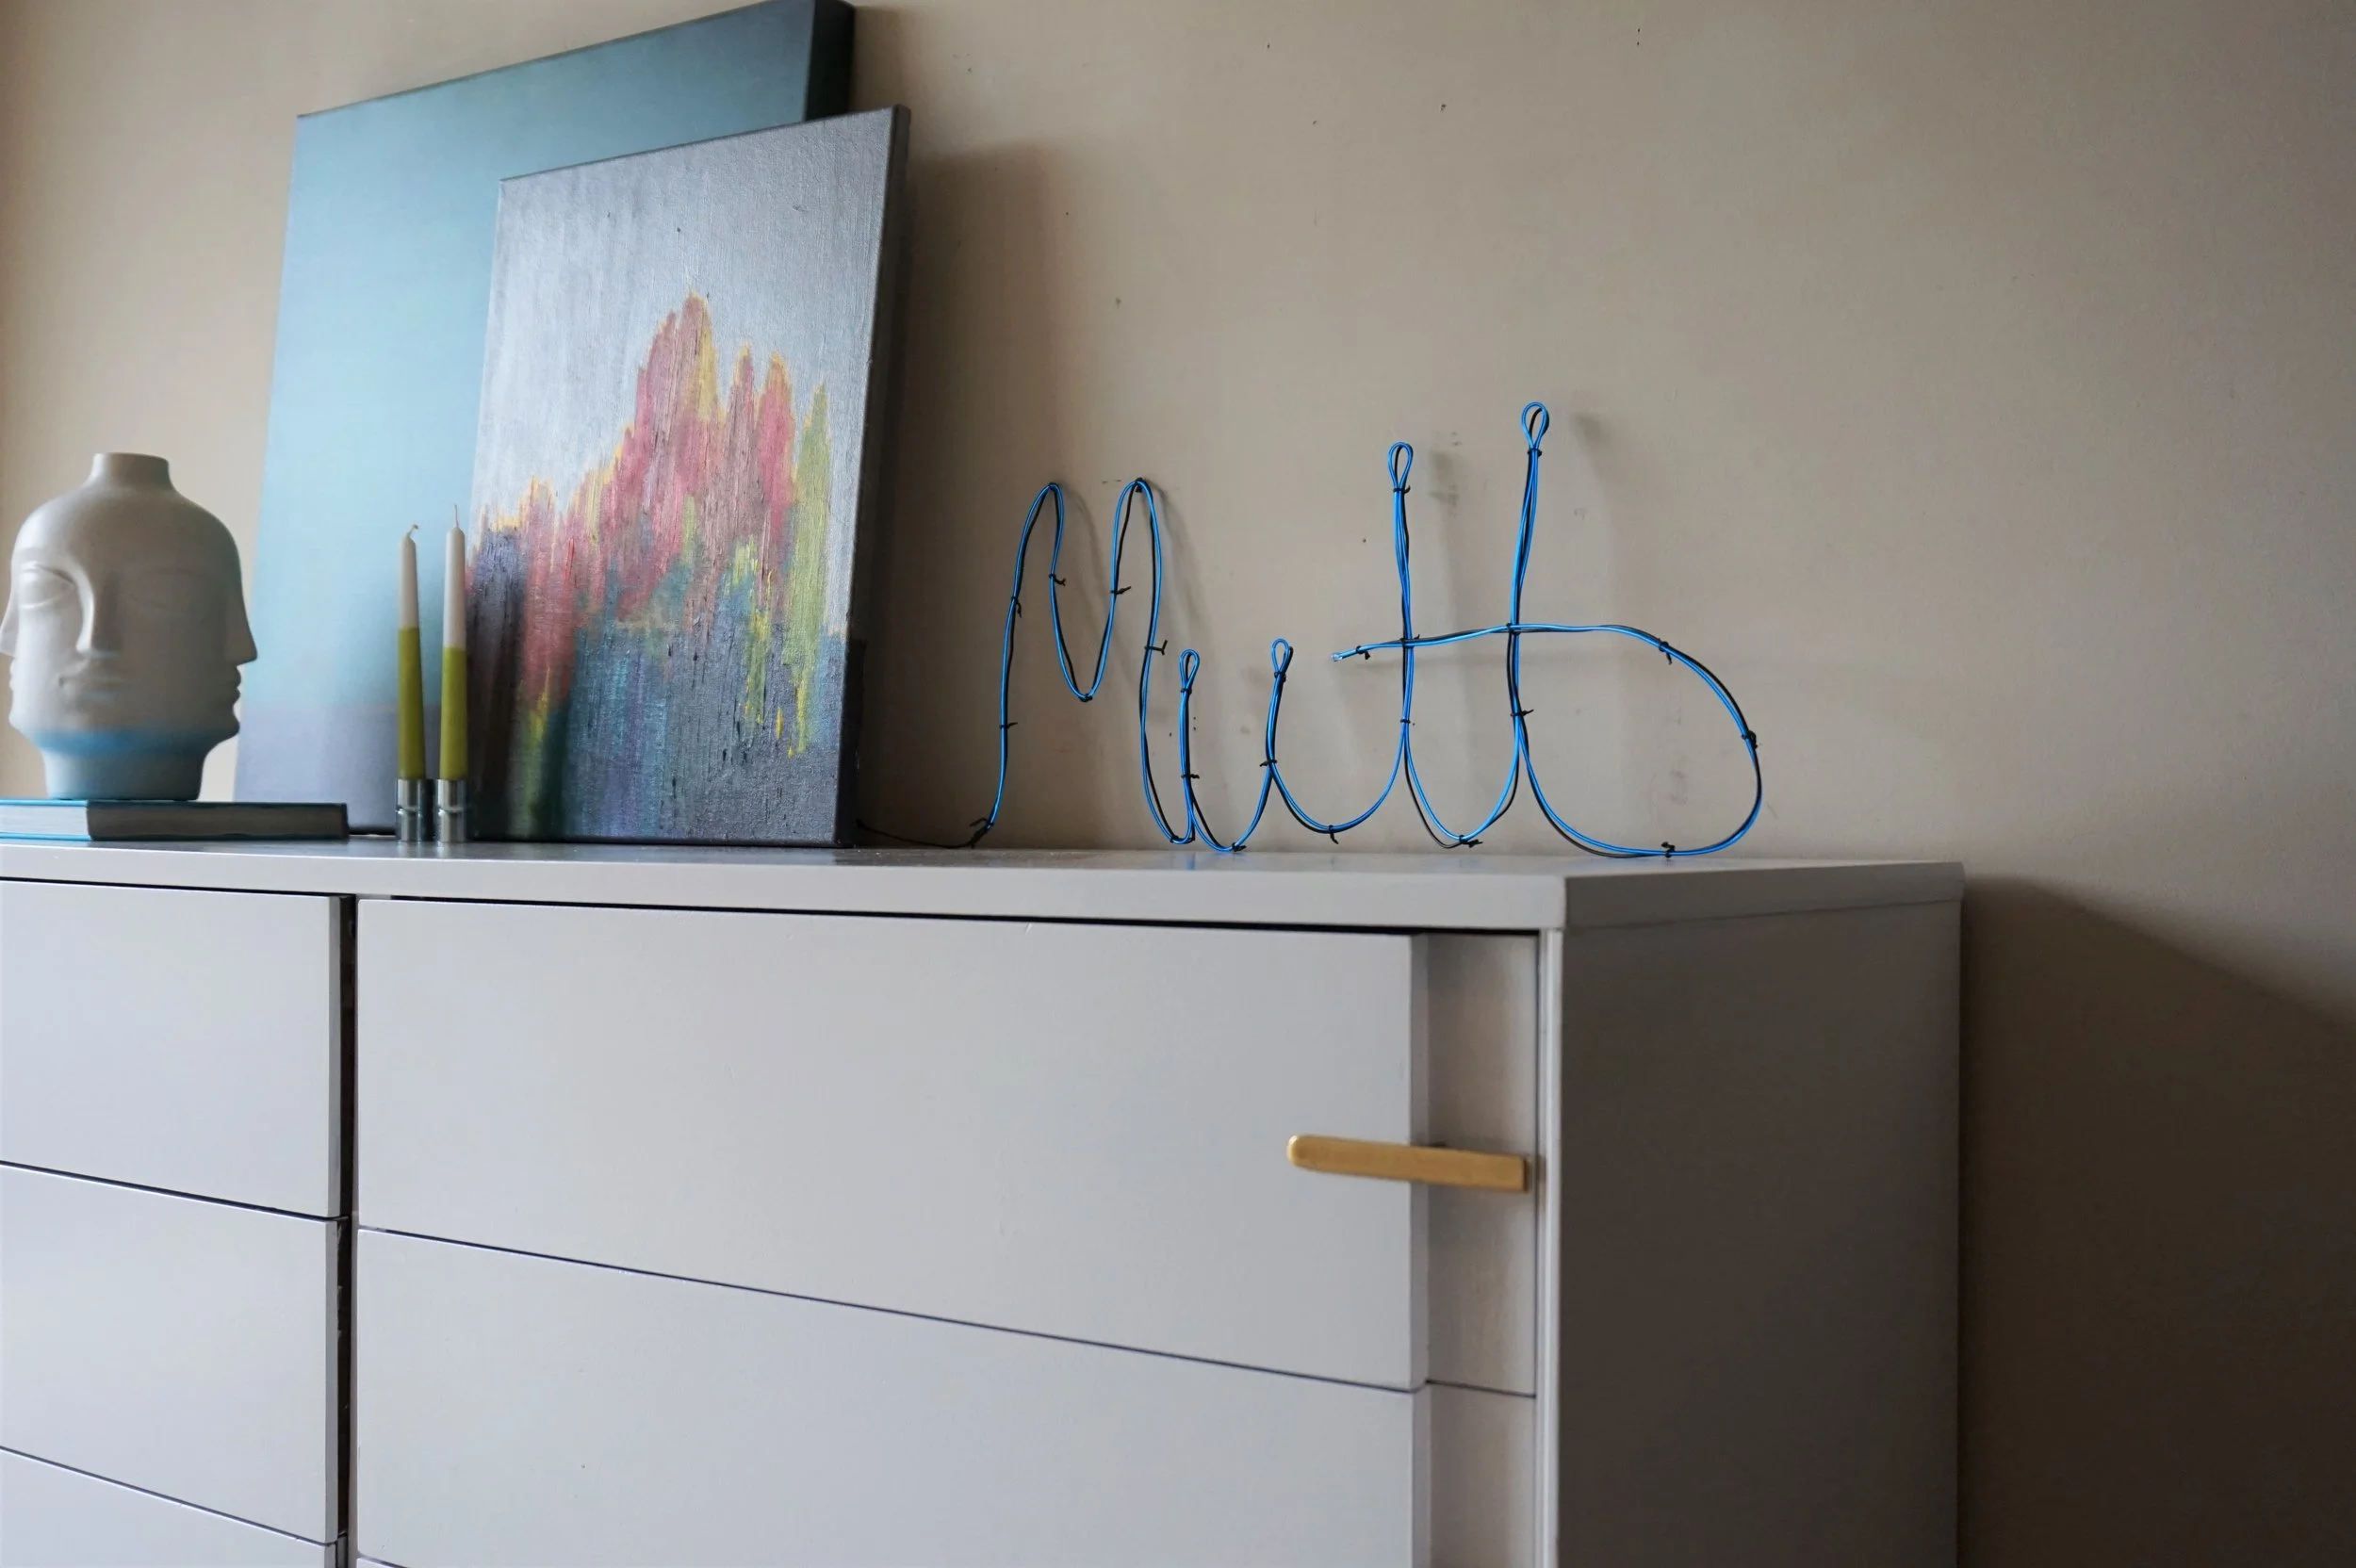
The kit instruction were very easy to follow and basically just involved lashing the neon rope to wire which I twisted into the word "Mutt" for obvious reasons.  It does have a very subtle hum when it's turned on (like the kind you can only hear if you're under 30 years) so it's a good thing I'm creeping up on the big 3-0.  HA!

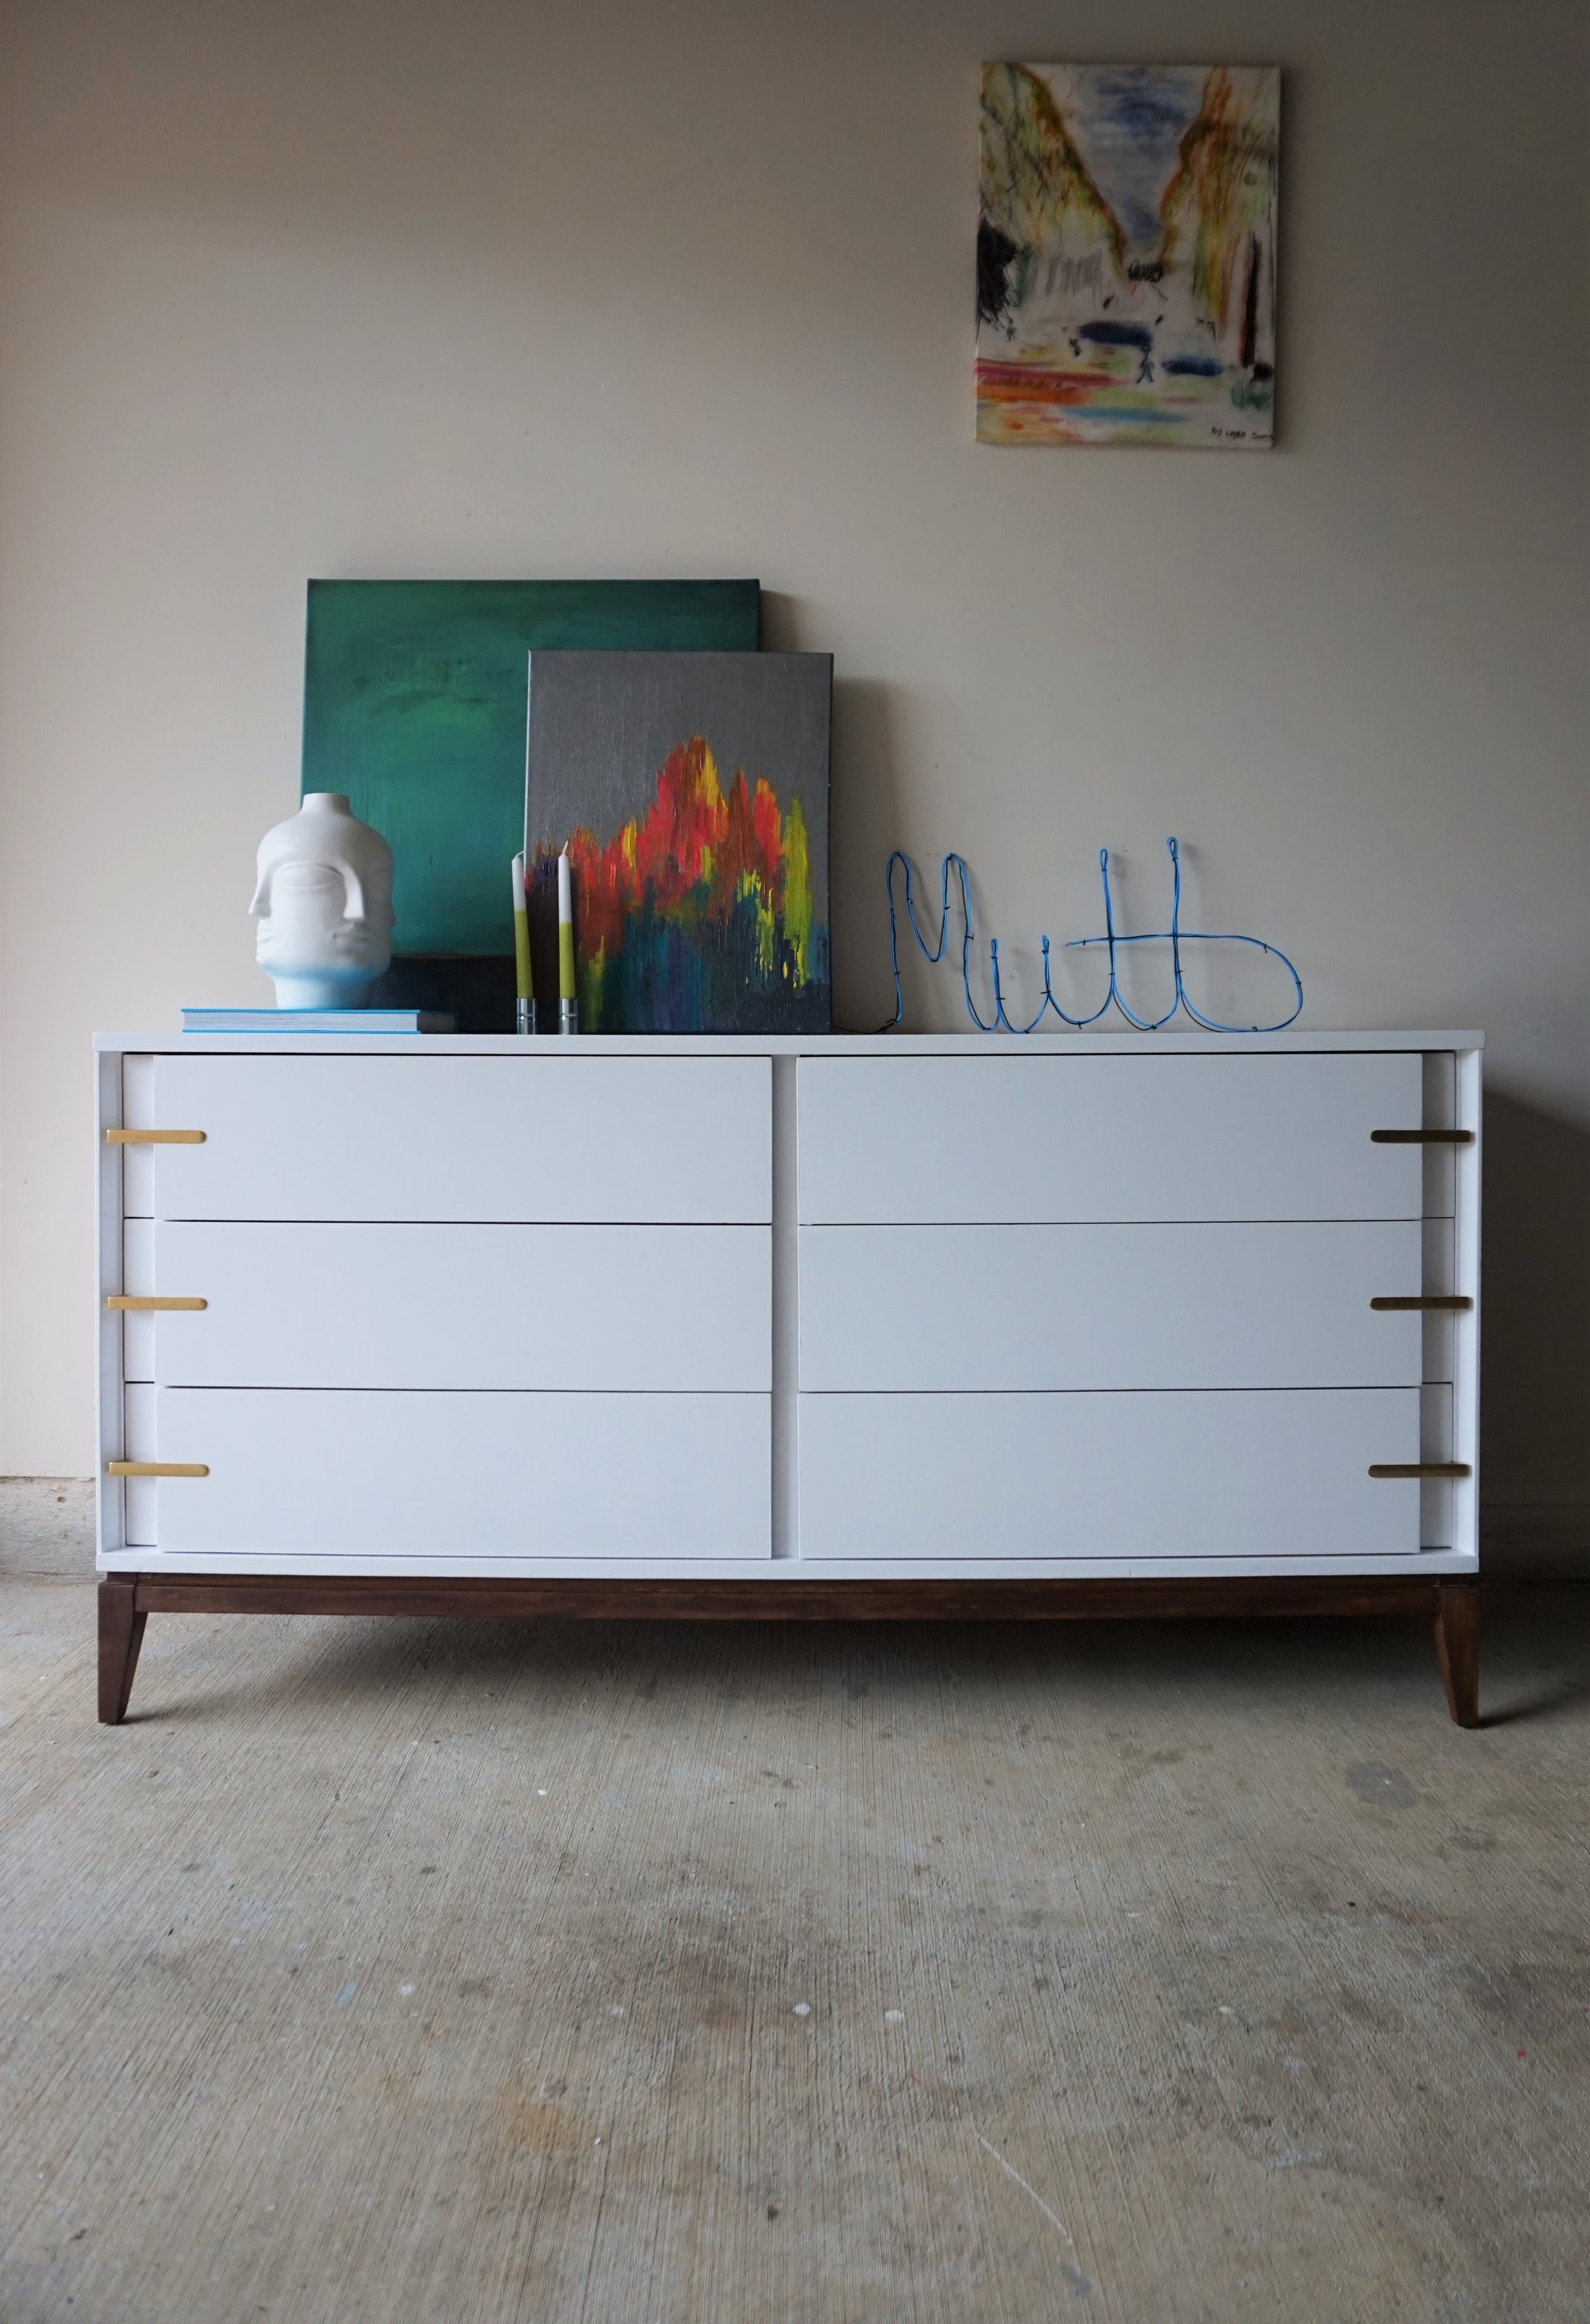
Switch gears with me really quick and let's talk about the other new kid in the room: this white and walnut dresser.

DSC03765.jpg

The drawer fronts were in great shape so I really did debate highlighting the wood grain, but I was seeing a very specific vision for it in my mind so everything but the legs got painted a glassy white.

Before.jpg

The original dresser did have some damage to fix - the big undertaking being the mystery gnaw marks in the left front leg.  Normally, I would putty that in and slap on some paint but I really reeeeeeeeally wanted to keep the base wood so I had to hand paint the filler with some acrylic paint to match the rest of the wood grain in the leg.

Damage.jpg

Can you tell?

DSC03710.jpg

I love the contrast of the dark legs against the white enameled body - a luxury finish!

DSC03726.jpg

You might actually recognize the unusual pulls on this piece from another StyleMutt refinishing project.  That's because this long-and-low is actually from the same line as that tallboy I did last spring.  Just like I did with that piece, I kept the original brass pulls as is 'cuz I mean, they are just. that. yummy.

DSC03734.jpg

As for the styling, I wanted to punctuate the bright neon sign with some bright-colored art like that enchanting Laura Gunn gallery-wrapped canvas print (cue all the heart eyes!).  Accenting with my usual quirky décor also seemed like a natural fit.

DSC03706.jpg

And if you're looking for a beautiful dresser to anchor your space, drop me a line (aka just shoot me an email) to discuss our pick-up or shipping options. 

DSC03738.jpg
 
White + Walnut Sideboard
Now Available for Sale
60"W x 18"D x 30.5"H
$595

If you are interested in this piece or a custom order like it, email me at cate@stylemutthome.com to ask about availability and our shipping policy.
Cate.jpg

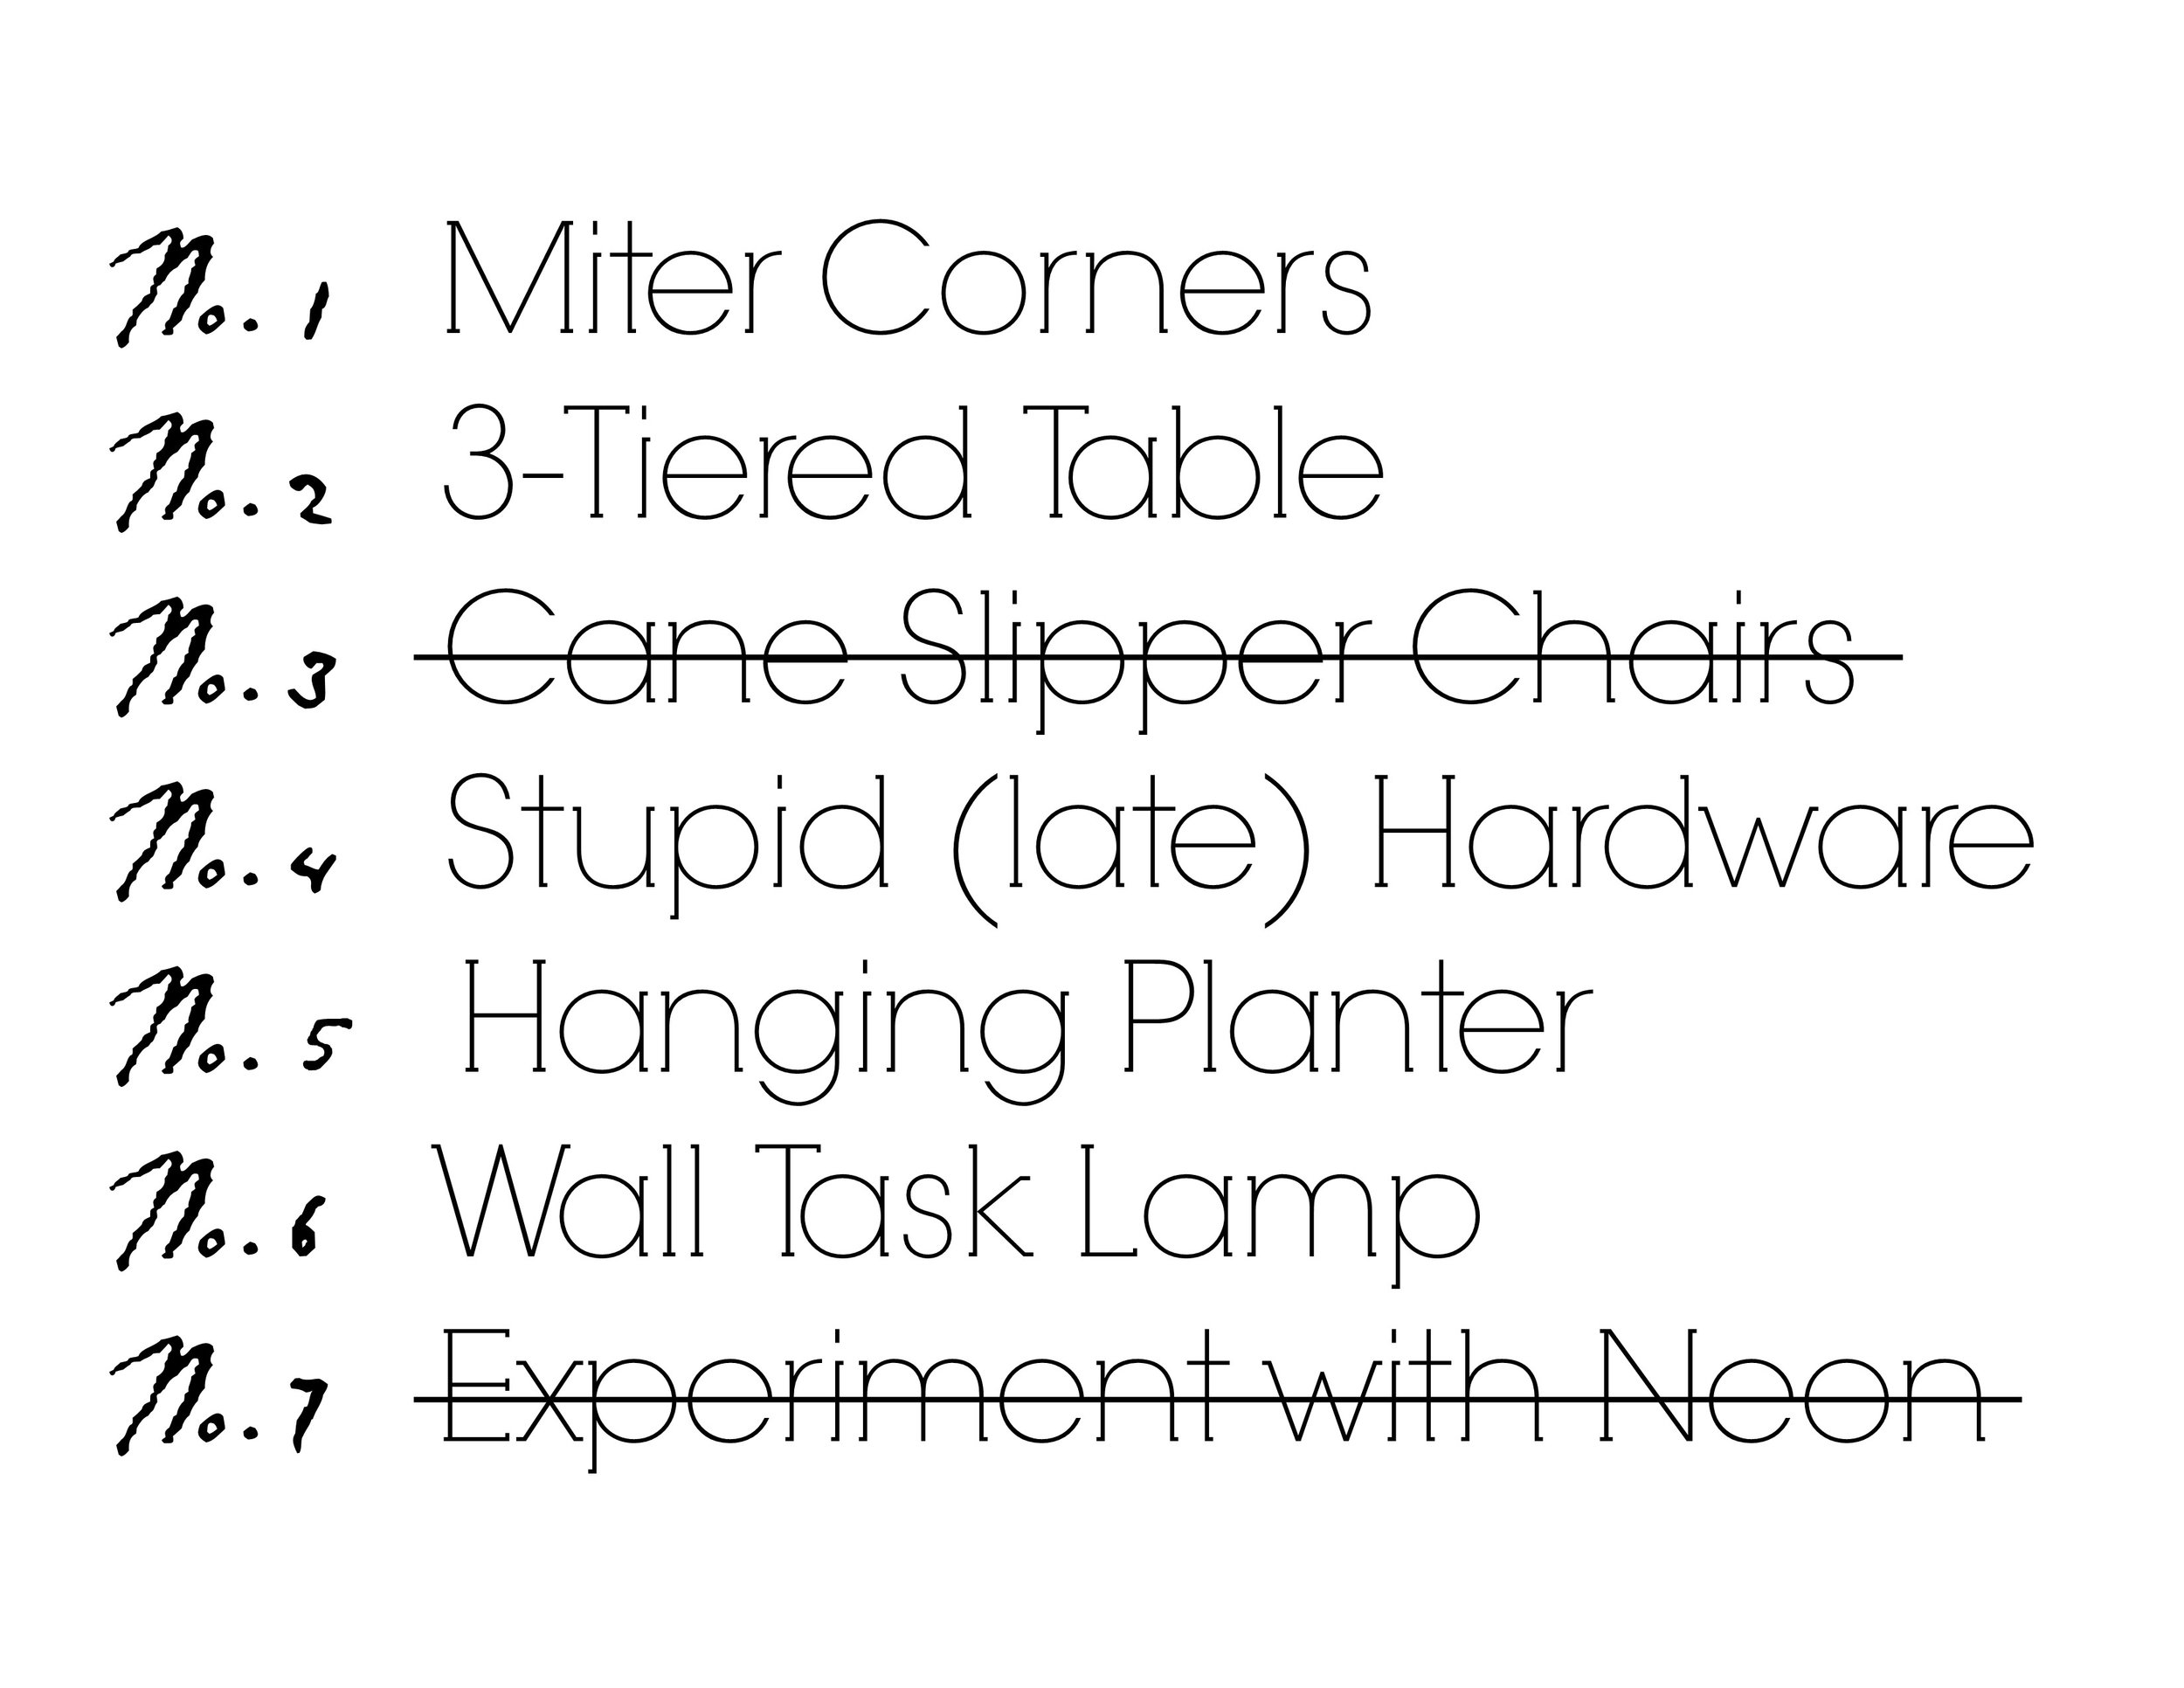
Two down, five to go.  Catch up on the 2018 Furniture Flip Bucket List:

Meet StyleMutt Home's NEW Design Assistant!

Hi Friends! We are THRILLED to introduce you to StyleMutt Home's newest team member, Joy Lewis! When we started the process of bringing on a design assistant to our team, we were completely humbled by the response. The turn out of passion and talent far exceeded our expectations, but we just kept coming back to Joy through each phase of the process. After meeting her it was the feeling I needed to have; total peace. She is someone that makes this growing process feel like the most natural thing in the world and she has already slid right in and taken on her first job, (with our first Australian client, nonetheless)!

It's such a delight to celebrate bringing Joy on our team with you today!

Joy has an impressive portfolio of projects under her belt that includes both her own home as well as corporate and private clients. We thought it might be a fun way of getting to know her better if we shared a few snippets of her past work!

Joy has the impressive skill of refinishing furniture to suit the style of the project at hand - this sweet storage cabinet was refinished by her hand and we are just smitten with her attention to detail, from color choice to the styling!

Joy and her husband tackled their own kitchen renovation recently and turned it into a functional, family friendly space that still maintains the character of their home.

The following are just a couple furniture makeover projects Joy has done. Isn't that ottoman the sweetest?!

Intro 2.jpg
Intro 1.jpg

Please join us in welcoming Joy to the StyleMutt Home team! We couldn't be more excited to have this sweet and talented lady on board with us. She truly is an answered prayer and the way she's jumped right in and gotten down to work in the brief time since she's started has already blessed our business in various ways.

We look forward to sharing the work that Joy is doing for StyleMutt Home as her projects progress! If you would like to see more of her previous work we invite you to head over to her site, Joy Lewis Design!

Thank you all so much for coming by!

joint.jpg

eDesign Reveal: Dani's Dining Room

StyleMutt Home hasn't been offering design services for very long - just the past few years, with last year being a break through year that accounted for 23 individual jobs as I switched gears to follow my passion for design full time. I won't get into dull shop talk except to say, we are a small but mighty team! Each of us, Cate, Mckenna and myself, all share a passion for home, and I've discovered that we each bring unique skills to the table. The reveal that I've got for you today is such a fun example of what happens when heads and hands come together.

You may recall our reveal of our dear client, Dani's, living room and breakfast nook from last Summer. Prior to that reveal we had already begun work on her dining room which is just around the corner from those other areas of her main floor. As you can see below, it was very important to me that her home tell the same story throughout. No surprise colors or accent walls! Dani's style is soft but edgy and she's up for taking risks as long as they're practical.

Want to see a before picture for the books?

21.jpg

It's amazing, isn't it. Hah! Dani and her beau, Nate, did the hard part - they painstakingly peeled the wallpaper and painted the room before we even started working together! That's a gigantic first step for any space! So it was a fabulous white box when we arrived, except for the gorgeous Anthropologie table that Dani had already purchased, and the fancy-schmancy chandelier that they'd been instructed not to remove by the landlords, (this is a rental).

The chandelier was a stumper. It's not Dani's style but at the same time this is a formal dining room, afterall. There aren't many of those around anymore these days! So with my first formal dining room to design I was thrilled by the challenge of figuring out how to make it Dani's style and 'speak the same language' as the rest of the home, as Cate says. The three design boards below were the original ideas for the space, with the final design being a blend of 2 and 3.

Final design! I happened by my favorite local stop-in, Valerianne of D.C. to see what they had as far as storage pieces and art - it was a hoot snapping all the viable options that day and texting them to Dani for her thoughts! The piece in the board below won her heart and she snatched it up right over the phone while they wrapped it!

Dining Room design board.jpg

So the room was coming along as decisions were made regarding the larger items, but we needed a lot of things to layer in. As much as I adore those shelves for the way they're constructed, they weren't cutting it totally empty. I had an idea of what I wanted them to look like but it was fuzzy, like I couldn't make out the precise details. So I reached out to Cate and McKenna explaining how I thought a really monochromatic look with a lot of white elements and some fresh greens would complete the space really well. They proceeded to scour the internet for all the pretty, neutral things, and then Cate took those items and created a digital rendering of how to stye the shelves.

OB-Dani's Dining Room Shelves.jpg

I mean, who gets to work with someone who can produce THAT?! It's pretty special. So with the big stuff and little stuff decided, our first formal dining room was born.

Oh yes, the old man sketch was also a Valerianne of D.C. purchase, framed at Michaels. We all like him and we don't know why. That's the best art though, isn't it?

1.jpg

Oh yes, before we go any further someone would like for everyone to know who's house this is:

16.jpg

Lonny has our hearts forever. We have a stack of pics of this sweet boy, but we'll stick with the room for today. ;)

3.jpg

One week before heading up to photograph the space with Cate I wasn't quite feeling a table centerpiece. I was toying with the idea of completely setting the table for the pictures, or creating a floral arrangement that would be placed off center...but nothing was sticking out as a winning idea. I texted my Momma, (who has a very good eye for this stuff), an unstyled progress picture of the room and asked for her thoughts. She suggested a long and narrow container full of tiny plants. Bingo! With little time to shop around I went to our local Lucketts Antique Store and found a galvanized metal feeding trough. Though the finish was too rustic for the space, there are times when you just can't beat finding the perfect dimensions. So I brought it home and gave it a couple coats of Rustoleum White Enamel. It's definitely a statement centerpiece without overwhelming the space. Exactly what the room needed! Way to go, Mom!

4.jpg

I think Cate had just a little bit of fun playing with these shelves before we took pictures. She styled them out of the park! That fuzzy idea I'd had months ago of how the shelves would look finished - this was totally it. How'd she do that?!

5.jpg
6.jpg

I love the peek-a-boo touch of brass on the chairs - such a subtle element but when I was looking into durable, wooden chairs that would measure up to the live edge and brass dining table, these spoke the language very well, indeed. I don't typically think of wooden chairs in a formal dining room, but these are pretty special.

8.jpg

Oh yes, and there's a gigantic mirror anchoring the entire other side of the room! It's not antique but it sure looks like it. That piece really ties the chandelier and other elements of the room together well.

9.jpg

Details for days...

15.jpg
14.jpg

Dani begged us to be in a shot where she was pretending to cut flowers. NOT! We asked her .237 seconds before snapping this if she'd mind jumping in so we could grab a living shot of the room. And guess who was right at her heels. :)

18.jpg

Well, that's a wrap! Sorry for the length today but I wanted to share a bit of the progress that went into transforming this space - it was such a fun experience! Dani just handed over her bedroom and we are thrilled to dive in and get started in there. We'll keep you posted!

Thank you so much for stopping by today!

Chelesa.jpg