Brass Finger-Pull Dresser || Flip List Item No.2 ||

Happy Labor Day style mutts!  As you may have seen in our posts last week, we've had some exciting news to share - including my debut DIY post on Apartment Therapy.  This little dresser was in desperate need of some MAJOR repairs, but it it ended up being the perfect dresser for the next item on my 2017 Furniture Flip Bucket List.  


The Before


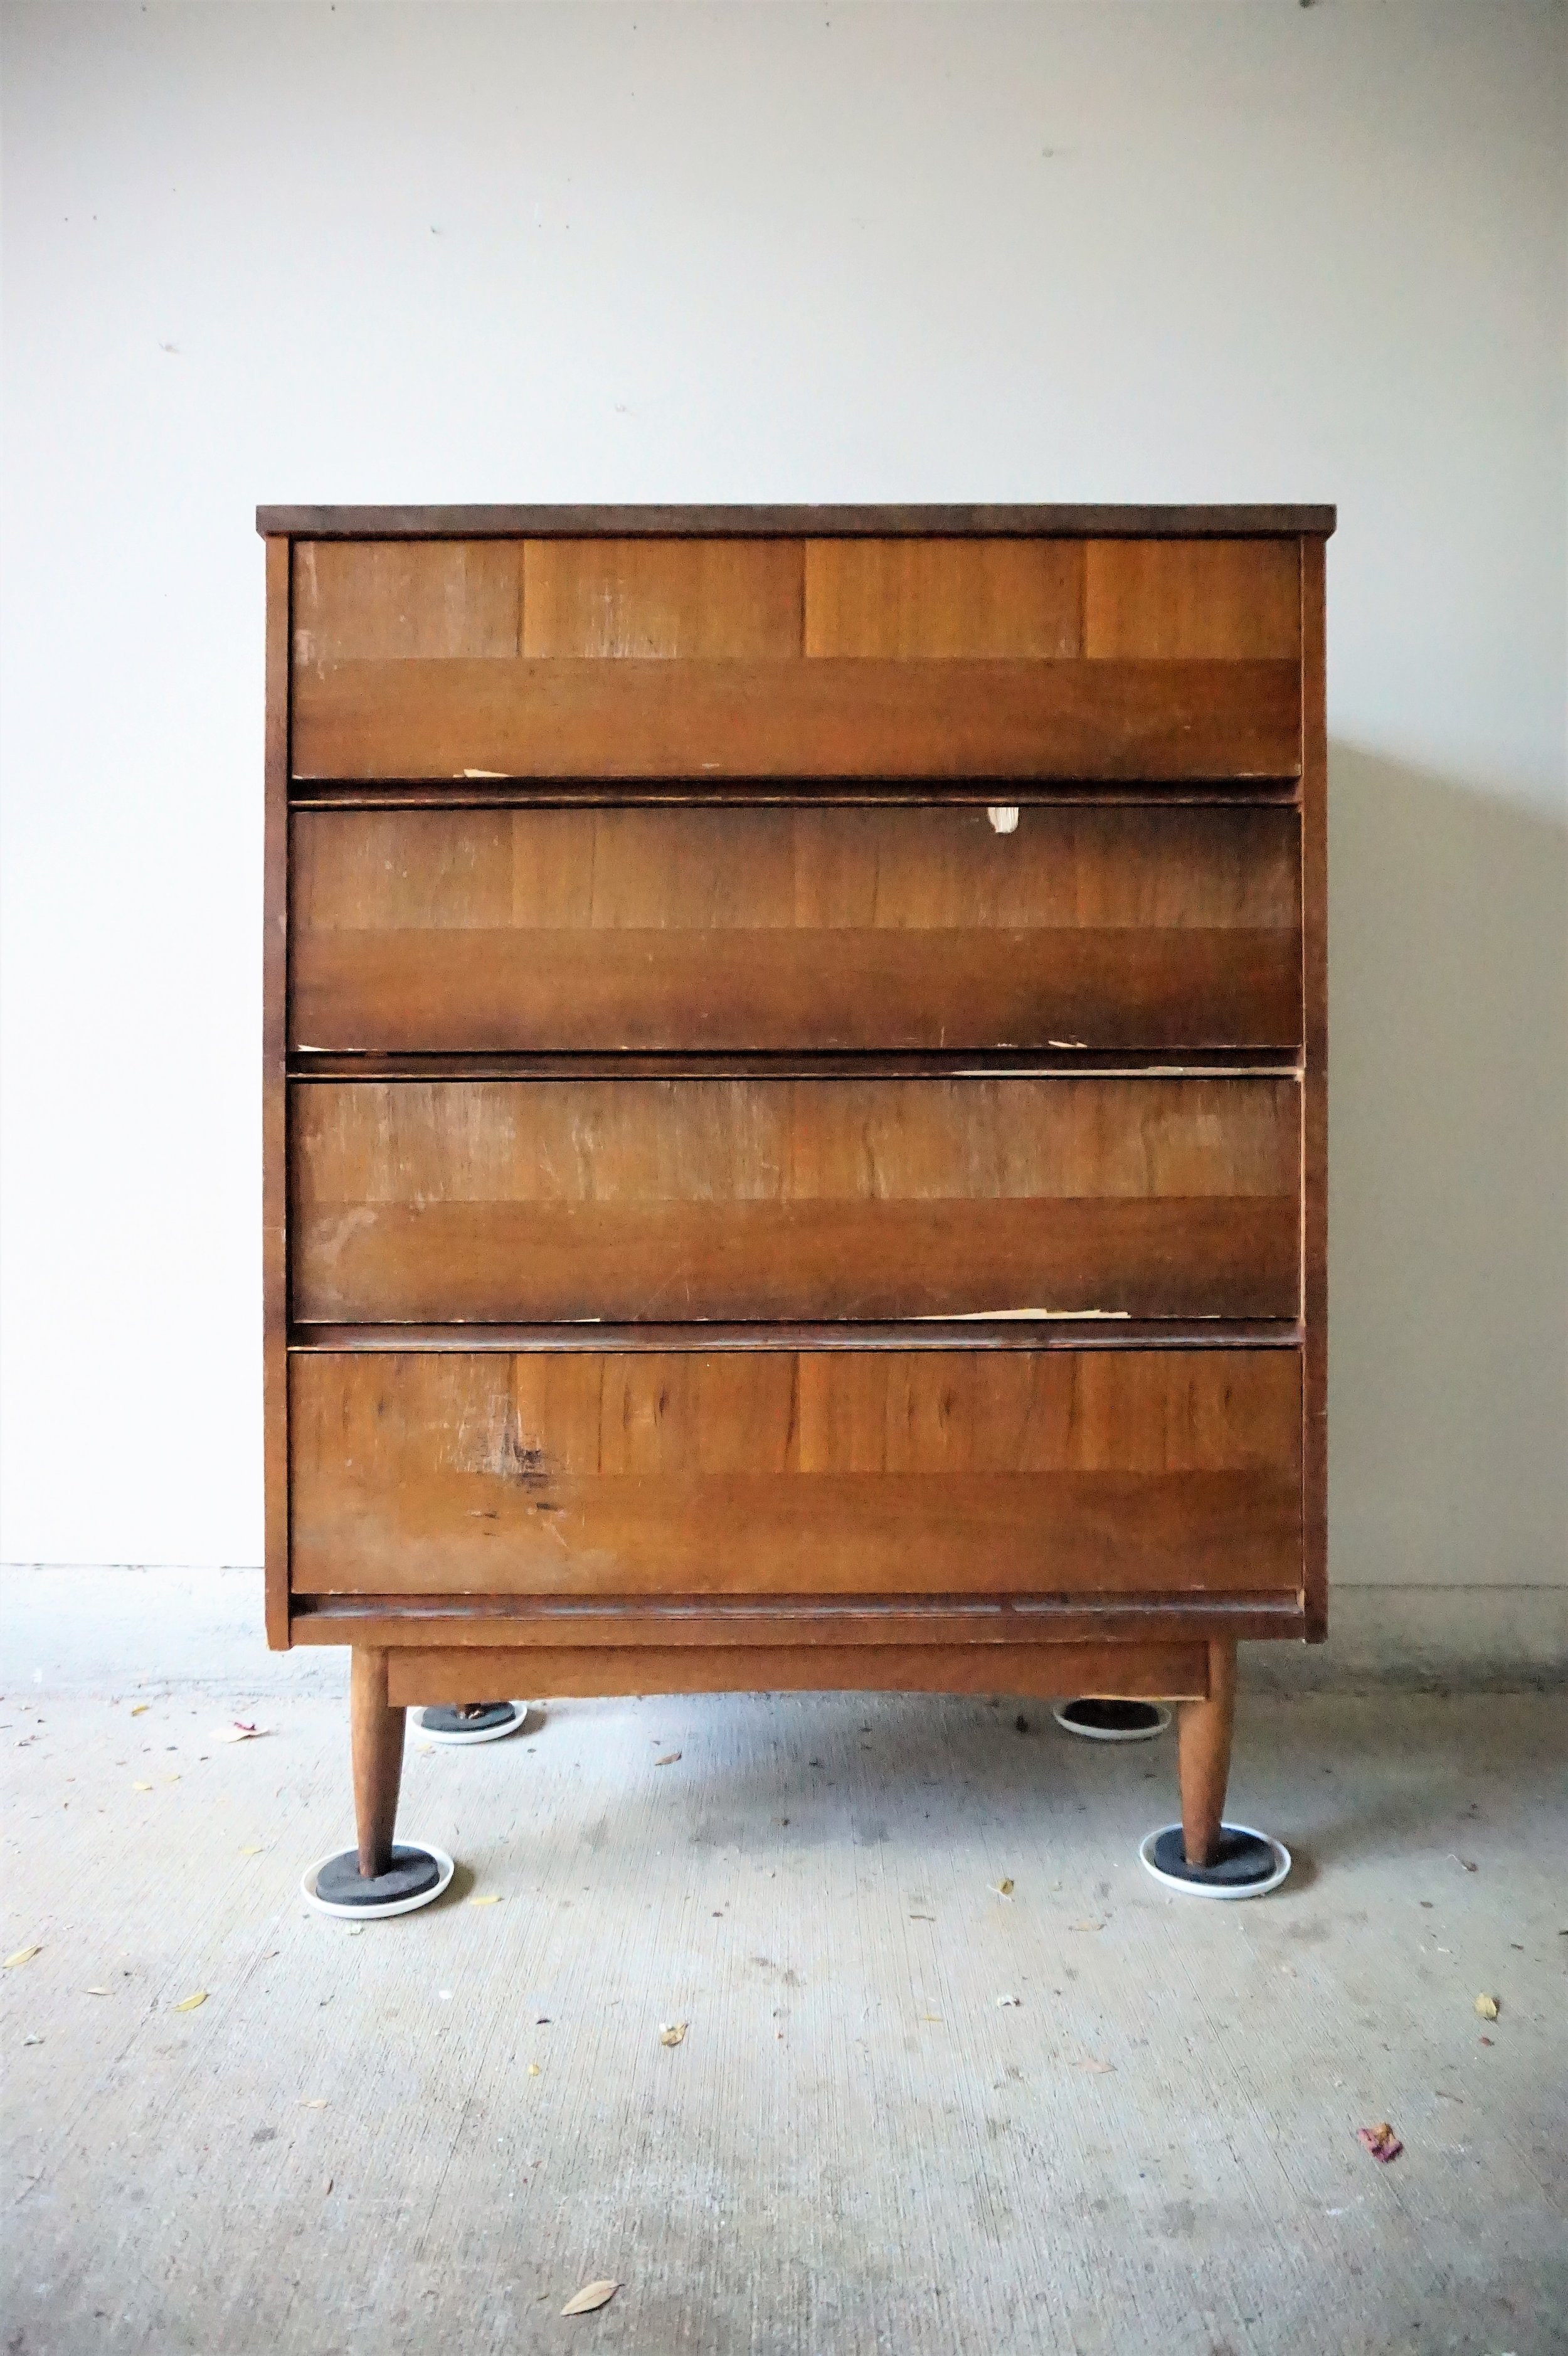
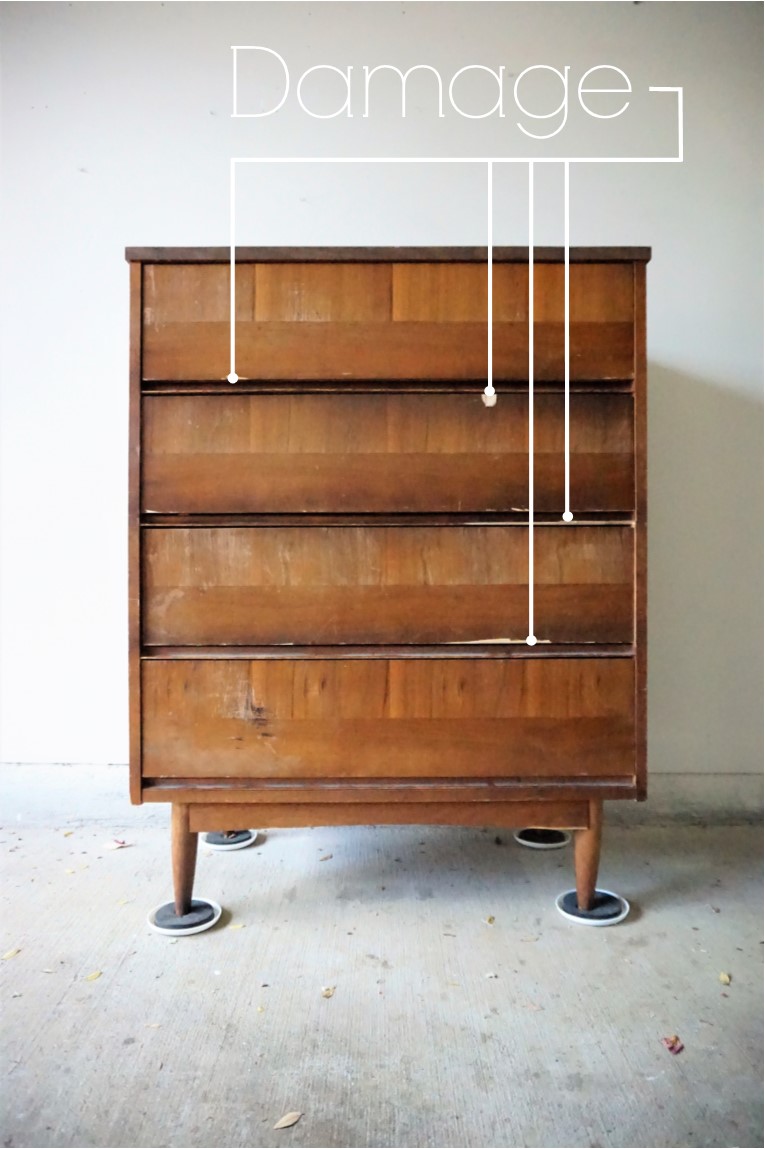
Now because this poor little dresser had so much damage (which I will go into more here on Wednesday), after all the repairs - I really had no choice but to paint.

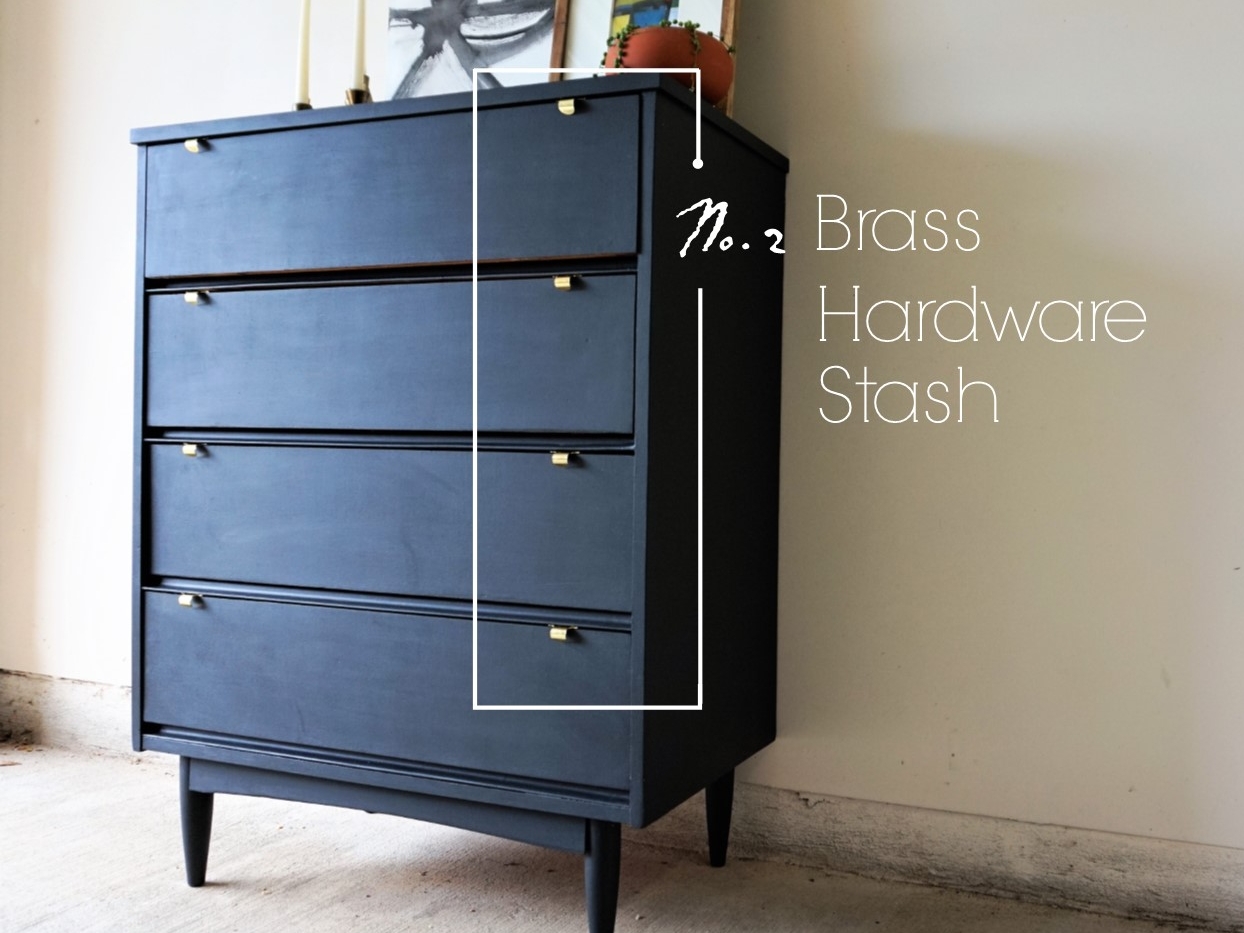
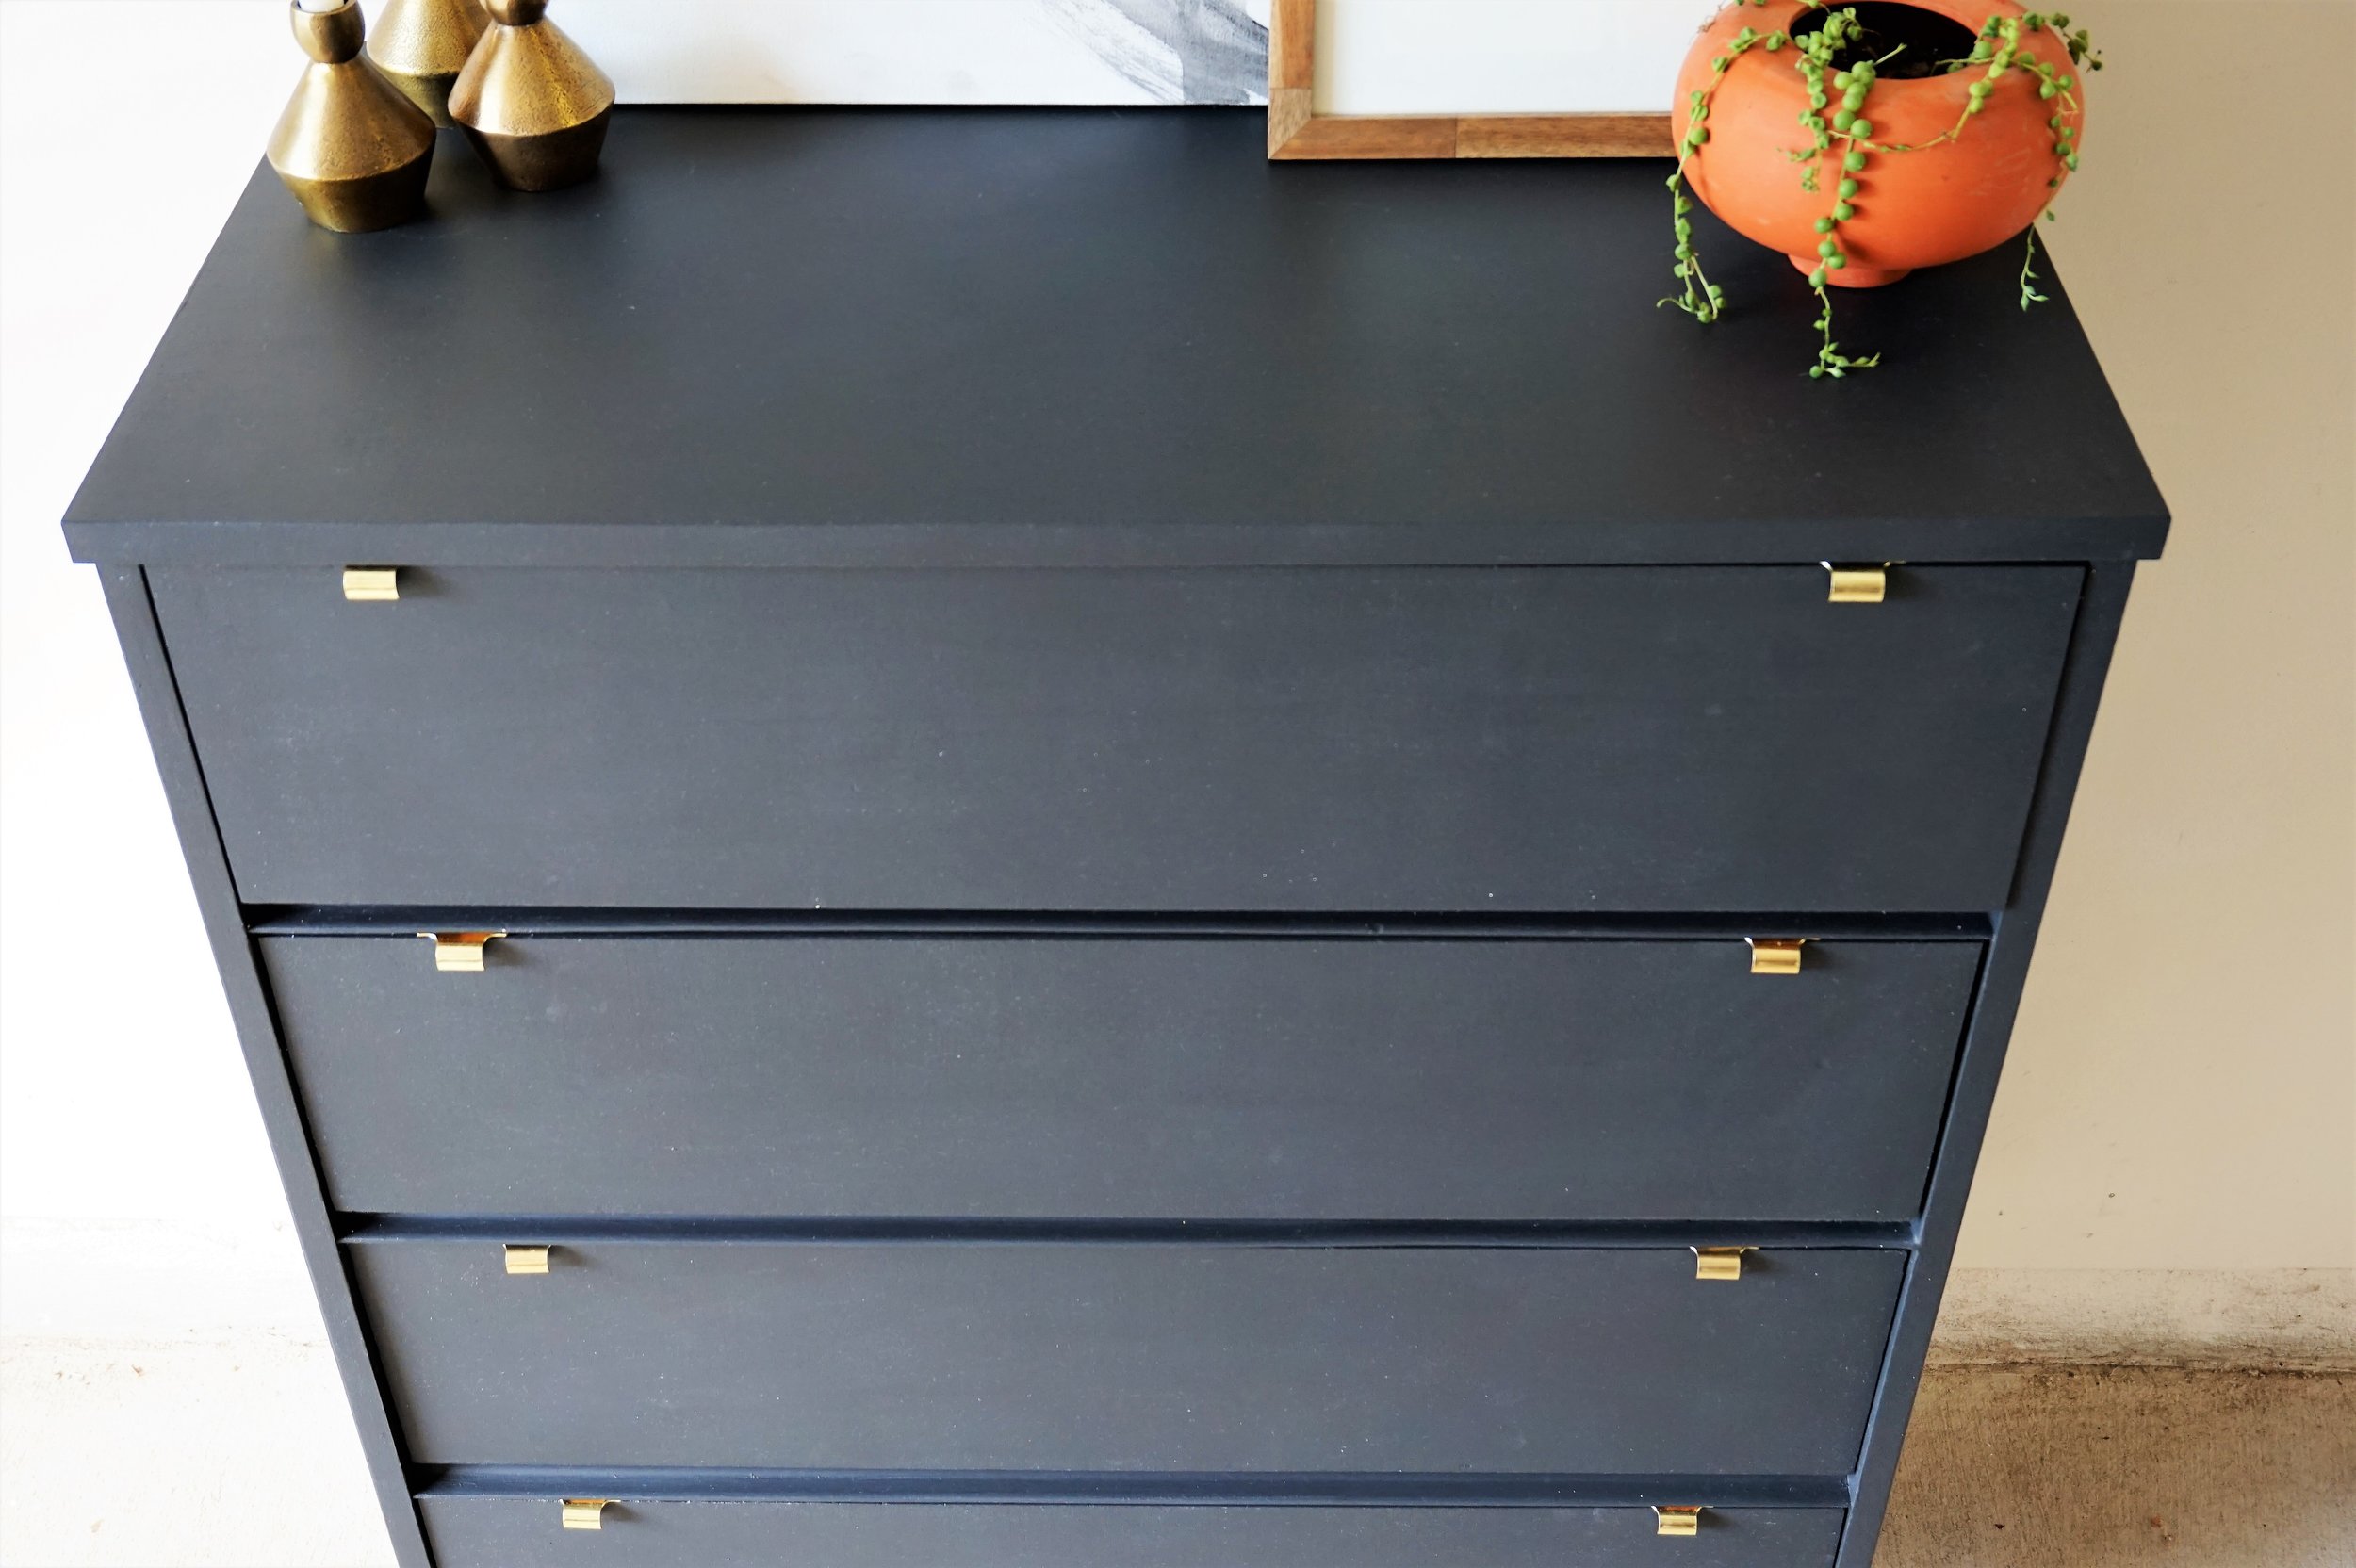
I resurrected my new fave color of choice: Black Boudoir by Behr Paint (same color I used on this two-toned flip in the spring).  Once the paint dried, it was time for hardware - and as you may know, I have been stockpiling this brass hardware since over a year ago.  Although these are designed to be library-like pulls mounted on the front of a drawer, I had other plans for these bad boys...

I wanted to figure out if I could mount them upside-down to the top of the drawers and make my own finger pulls like the hardware on Chelsea's christmastime flip from last year.

Because of the narrow gap between the drawers and the decorative trim, I needed something with a lower profile than a traditional screw to attach the hardware - so I went with brass tacks.

Tacks aren't designed to withstand a hit from a hammer, so I used a rubber mallet to tap in each tack gently.  And...

It worked!

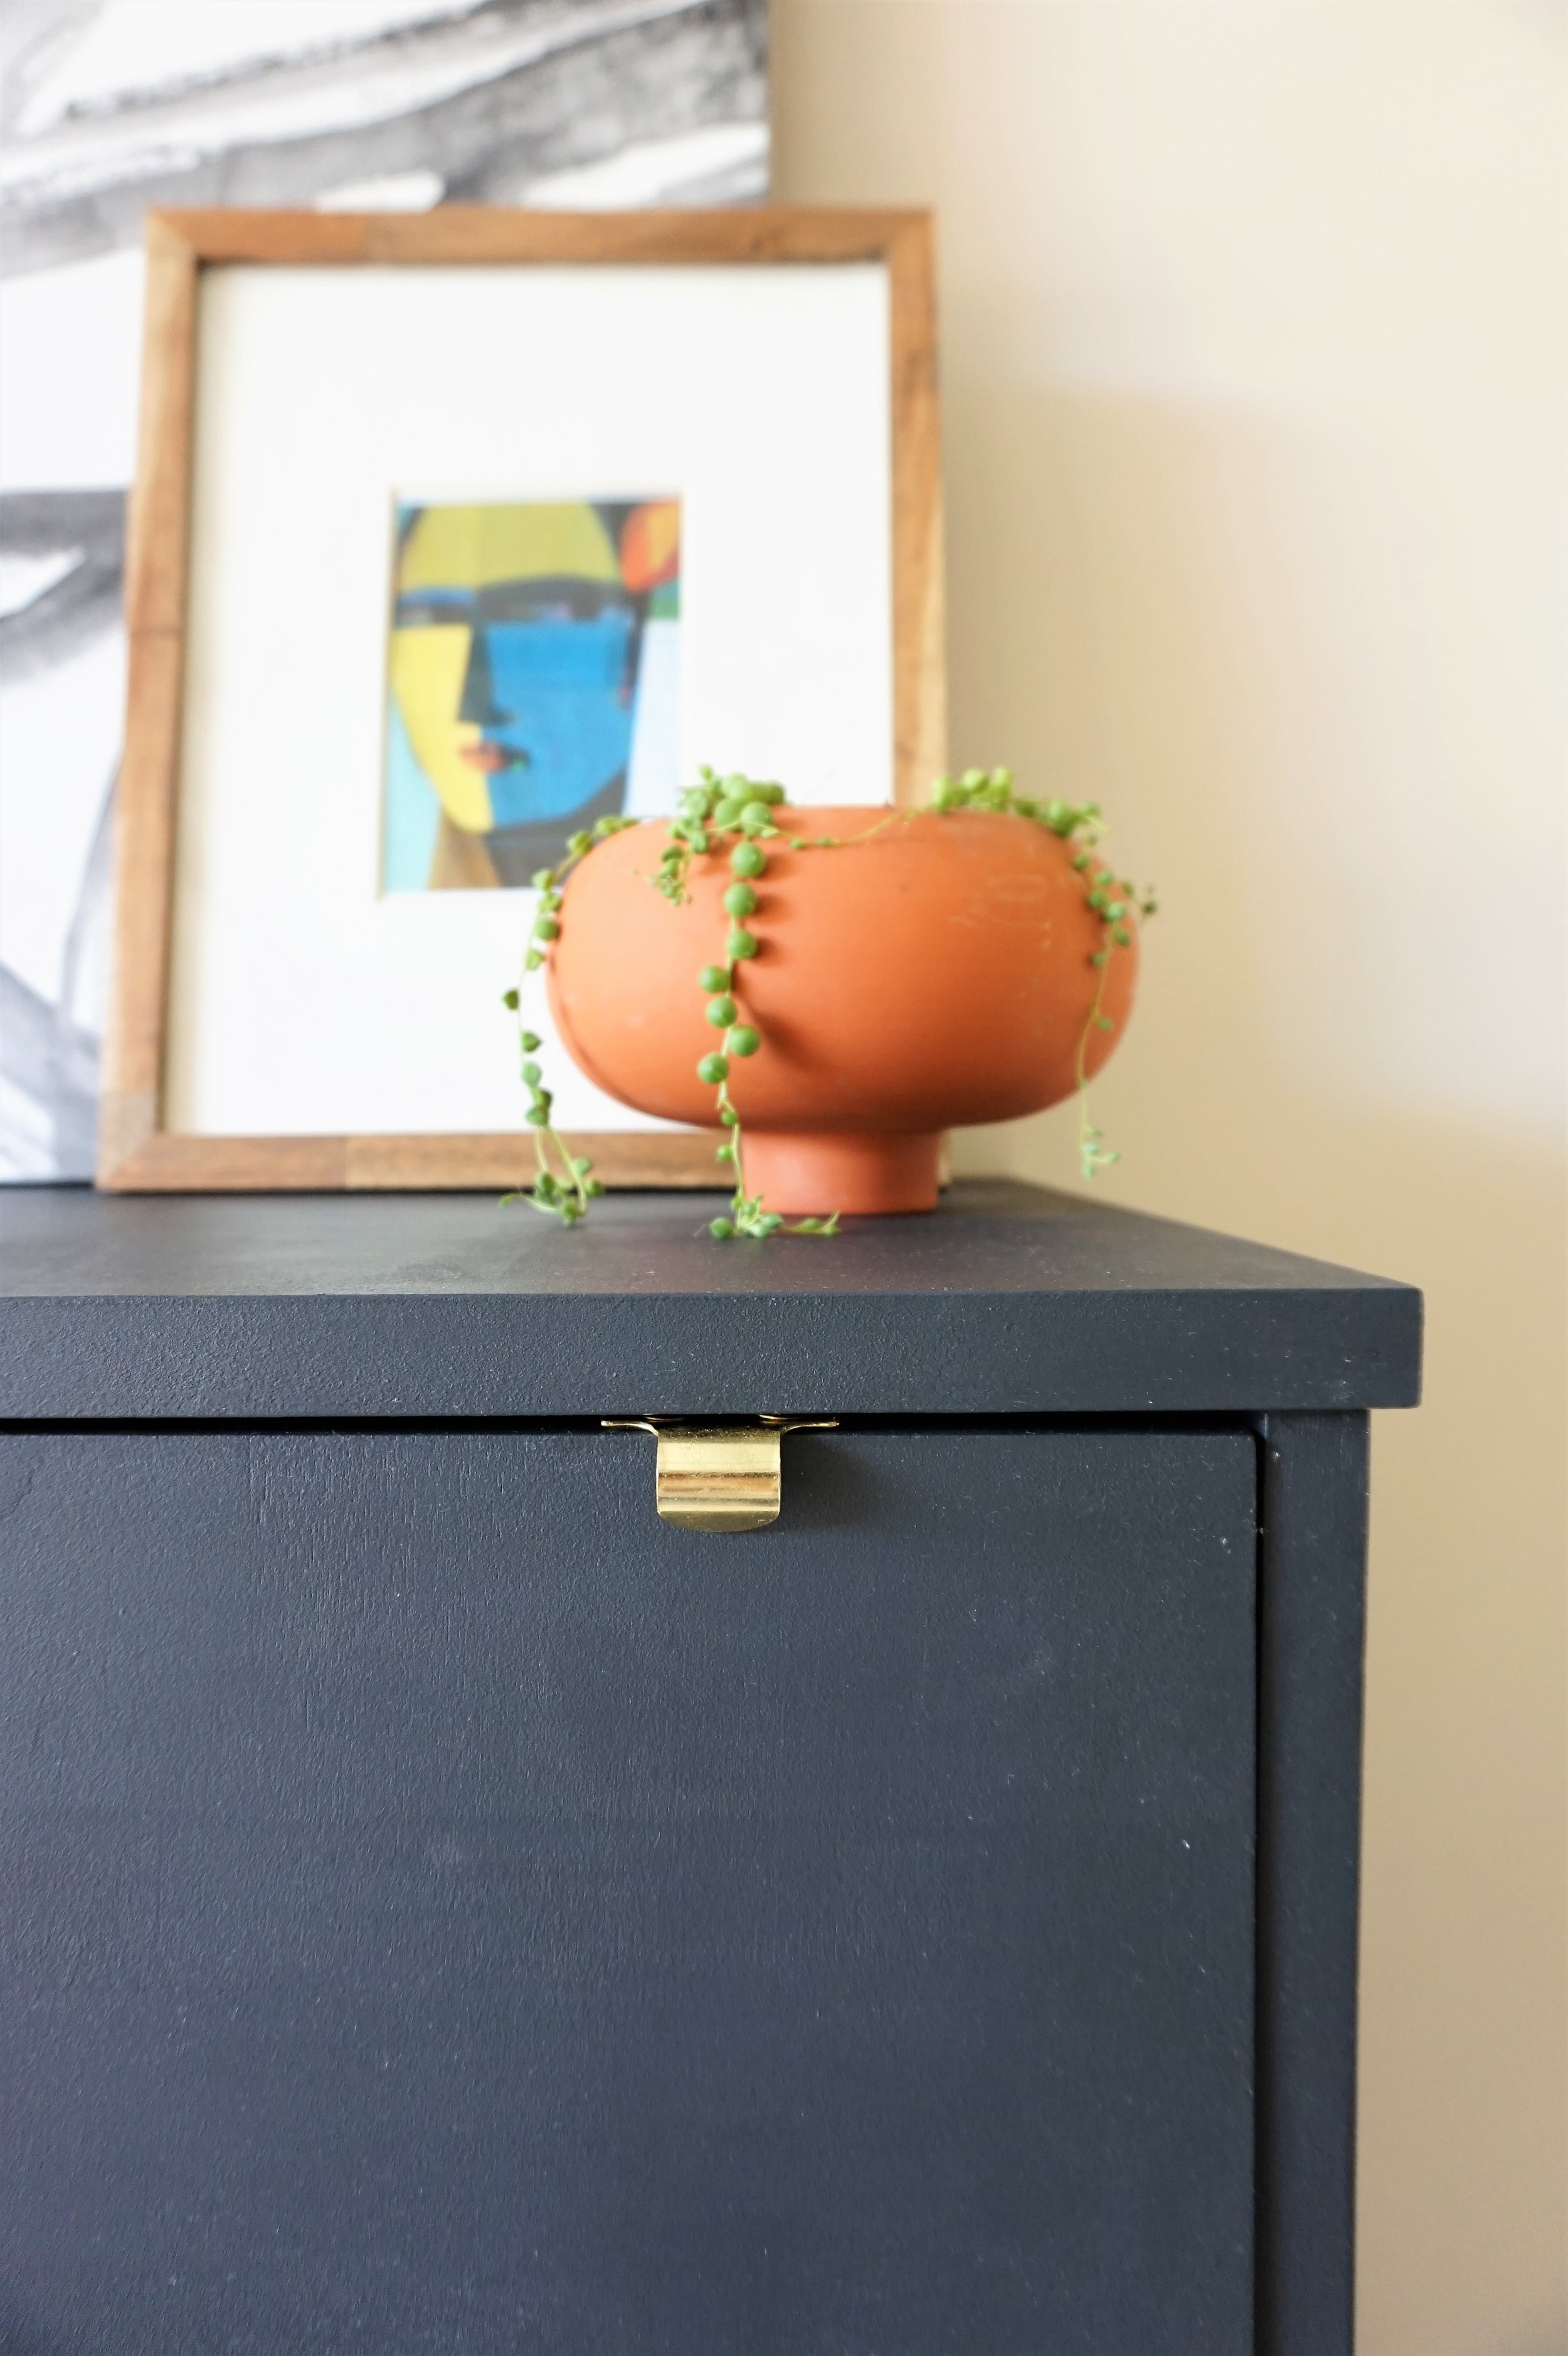
I had just enough clearance for the hardware!  The end result - a handsome double-breasted gent of a dresser.

Don't forget to circle back here come Wednesday for more details on how I rebuilt some of the dresser's splintered trim FROM SCRATCH (and a tutorial so you can do it too ;).

Brass Finger-Pull Dresser
Now Available for Sale
34"L x 18"W x 44"H
$495

If you are interested in this piece or a custom order like it, please contact me at cate@stylemutthome.com.

Five down, two to go.  Catch up on the 2017 Furniture Flip Bucket List.

Industrial Pipe Bookshelf

Only 3 more days until Christmas!!!!  Admittedly I am equally counting down to spending time with family as I am to having a real break from my day job.  I haven't taken more than 2 days off for over a year so I am really really looking forward to a bit of an extended stay-cation.  As we count down to the holidays, I am also wrapping up some overdue flip debuts before getting ready to start rolling out new pieces in the new year.  

Remember my industrial sawhorse desk?  Well when the buyer came to pick it up last fall, it turns out she didn't need the 3-drawer hutch since she planned to float the desk in her office.  So she bought the desk, chair and lamp, and left the orphaned hutch drawers behind so I took the opportunity to play around with a new take on industrial-inspired storage.

Industrial Pipe Bookshelf

I re-re-used the drawers to make a 3-tiered bookshelf with loads of storage.

I drilled two holes through the front and back of each drawer and threaded a section of galvanized pipe through.  Each dovetailed drawer hangs level and secure by resting on pipe coupling at one end and a heavy-duty wall bracket at the other.

The staggered heights provide visual interest while allowing space for art or plants.

I tested the weight limits of the unit myself by literally loading up every flat surface with all of our hardcover books.

At the top, a small section of pipe also secures to the wall for more stability. 

And another flange at the base can be secured to the floor too.

The entire length of pipe disassembles easily into 4 sections for transporting. 

You could even swing out the middle drawer and mount the whole unit into a corner for even more versatility.

I would love to see this baby go to a cool loft or some other city space!  If you are interested in this piece or a custom order like it, please email cate@stylemutthome.com.

Industrial Pipe Bookshelf
Now Available for Sale
63"W x 7.5"D x 78"H
$395

As we gather together this Christmas, Chelsea and I pray that your holiday is filled to the brim with treasured family time.  We hope that the hustle and bustle will fade away and we'll all be able to truly savor the real reason for the season.  Merry Christmas to you all!

DIY (aka Frankensteined) Chandelier || Flip List Item No.3 ||

Happy Halloween Style Mutts!  As you may well know that this summer, I made lofty promises that I would soon be posting a BIG REVEAL of my 2016 Furniture Flip Bucket List item No.3...   Well, the end of October may not classify as "soon" exactly but what better day for a reveal of a frankensteined chandelier than all hallows eve?

IMG_5137.JPG

God must've had a good chuckle when I ended my post back in July with "I'm still working on the wiring for the sputnik chandelier and [if all goes well] will be sharing the results soon!"  Unbeknownst to me, He obviously knew I was in for a wild electrical wiring ride, a puzzle of a mounting mechanism, and a treacherous install while balancing on the back of our couch.

Before we continue, let's pause for the obligatory disclaimer: I am not an electrician.  I built, wired, and installed this light fixture at my own risk.  If you are interested in building, wiring, or installing your own light fixture - please do EXTENSIVE research before you lift a finger and consult a professional electrician.

We good?  We good.  

Ok so this project started when I found an old foyer lantern in August 2015.  The bulb apparatus inside was so cool!  The staggered lengths.  The brass finish.  I harvested what looked useful and repurposed the glass shell as an umbrella stand.  Now that I had the arms for a sputnik light, I needed to find a body.  I was considering building an angular wooden skeleton that I could route wires through until I found a quirky mid-century modern table lamp for a whopping $15.


The lamp's hollow brass square rod was perfect!  I officially had what I needed to build the frame.

And in case you're wondering, the rest of the table lamp didn't go to waste either.  It became a plant stand:

Making the complete family tree as such:

IMG_5136.JPG

So at this point, I'm staring at the light-less frame of what could be a really cool chandelier after over a year of planning and I. Am. Stuck.

First off, the hollow cavity in the brass rod I took from the MCM lamp was very very narrow.  I tried splicing the existing wires from the foyer light bulbs and running those up through the rod.  When I finally hooked it up to a plug in socket to test it, only half of the bulbs were working.  

We need more power Igor!


Ruling out a dead light bulb or two, I had to disassemble the entire thing and start from scratch.  After consulting a professional at the Lamp Factory Outlet in Fairfax, Va, I learned that I needed to buy a new sockets for the faulty foyer bulb arms.  They were so cheap (like $2 each) that I order a new one for each of the arms (just to be safe) and picked up some new 16 gauge stranded copper wire from home depot.  I bought the wire in both black and white so I could keep my hot (black) and neutral (white) connections straight for when it came time to install.  


When I was researching all these issues, I found this tutorial by ModFruGal to be very thorough and helpful.  Plus - they have a shopping list if you a building a brass arm chandelier from scratch instead of going all Dr. Frankenstein on some poor lamp parts.


Once got all the sockets working and threaded the 8 wires (one black and one white per socket) through the center piece, I then had to conjure up a way to cap the center cavity with a chandelier ring to attach the chain to.  When working with your standard light, a chandelier ring would simple screw in to the top of your fixture.  But this was not standard light and I had to figure out how to secure a round peg in a square hole.  Now here is where I MUST reemphasize to not do this at home without consulting a professional first...

I glued it on.  I know - not the best solution.  I tried metal epoxy and couldn't get a strong enough connection for it to set.  I ended up straight up gorilla gluing it.  And it's working great so far.


Ok.  So now I have a fully wired brass lamp frame (we did it Igor!) but still have to figure out how to install it.  Caleb and I are still renting so whatever we did, it had to be reversible.  Luckily Home Depot has an awesome recessed can light conversion kit by Westinghouse and our apartment has a can light directly above our dining room table.  The kit was really easy to install thanks to a handy step-by-step video.  

Source: Home Depot

Source: Home Depot

This is where it gets a little hairy to explain.  Not everyone will have the unique problems that I encountered  in my non-standard chandelier install, so for your sake, I'll spare you the details.  But you can always email me for more troubleshooting deets if you are somehow in a similar pickle.

Even with all my planning and sketching, I didn't have a solid plan for the mounting plate.  Luckily I don't often throw things away and I still have the leftovers from the original foyer lantern that started this whole thing.  Inside the lantern was a round plate with four holes for each arm and one in the center.  

I only needed the hole in the center to thread the wires through the chandelier loop at the other end of the chain.  But the extra holes did end up coming in handy. They allowed me to screw the mounting plate onto to the brace assembly from the can converter kit,  After it was secure and I could pull my screwdriver out, I capped the four extra holes with some threaded nipples, a few nuts, and four brass finishing caps,

Ok.  Enough tech talk.  Let's get to the juicy reveal already!!!

In all my mad-sciencing, I didn't think to account for the balance of the varied brass arms.  

But I don't even mind that he doesn't hang straight - it gives him an angular mid-mod playful vibe.  And hey - Frankenstein's monster wasn't perfect either.  He could only say yaaaaaaaaaaaaaaaaaaaaaarp after all.

Alright Igor - flip ze switch!

DSC_0254-001.JPG
IMG_5130.JPG
IMG_5131.JPG

So all in all this project was a monster to gather, a monster to build, and a downright monster to install!  But when it was all said and done, I still only spent a little over $100 on this project.  Although that's a little higher than I like to spend for pieces in our own home, this was still a winner in my book compared to buying new.

Stay safe trick -or-treating out there tonight friends!  And if you need something to binge read while you're raiding your candy haul, catch up on the other completed furniture flip bucket list items: