Navy Campaign Dresser ||Flip List Item No.4||

Woohoo!  It's fall and I've got another item to cross off my Furniture Flip Bucket List!  I know I shouldn't celebrate too much because I've only got 3 months left to finish the last 3 items, but I'm still gonna take moment to pat myself on the back.  


Since debuting my list of new year's resolutions back in January, I've crossed off items No.6No.5, and No. 7 and now No.4: Refinish a dresser in a velvety navy with gold hardware.  (I know, I'm going in a weird order.  If you're OCD-prone, then my apologies.)  I really should have added refinish a campaign dresser to the list too because that's been a dream of mine too - so I'm crossing this one off as 2 personal wins:

Inspiration Photo Source: Wife in Progress

Inspiration Photo Source: Wife in Progress

So if you are so kind as to follow me on instagram, then you may recognize the original piece from this post:

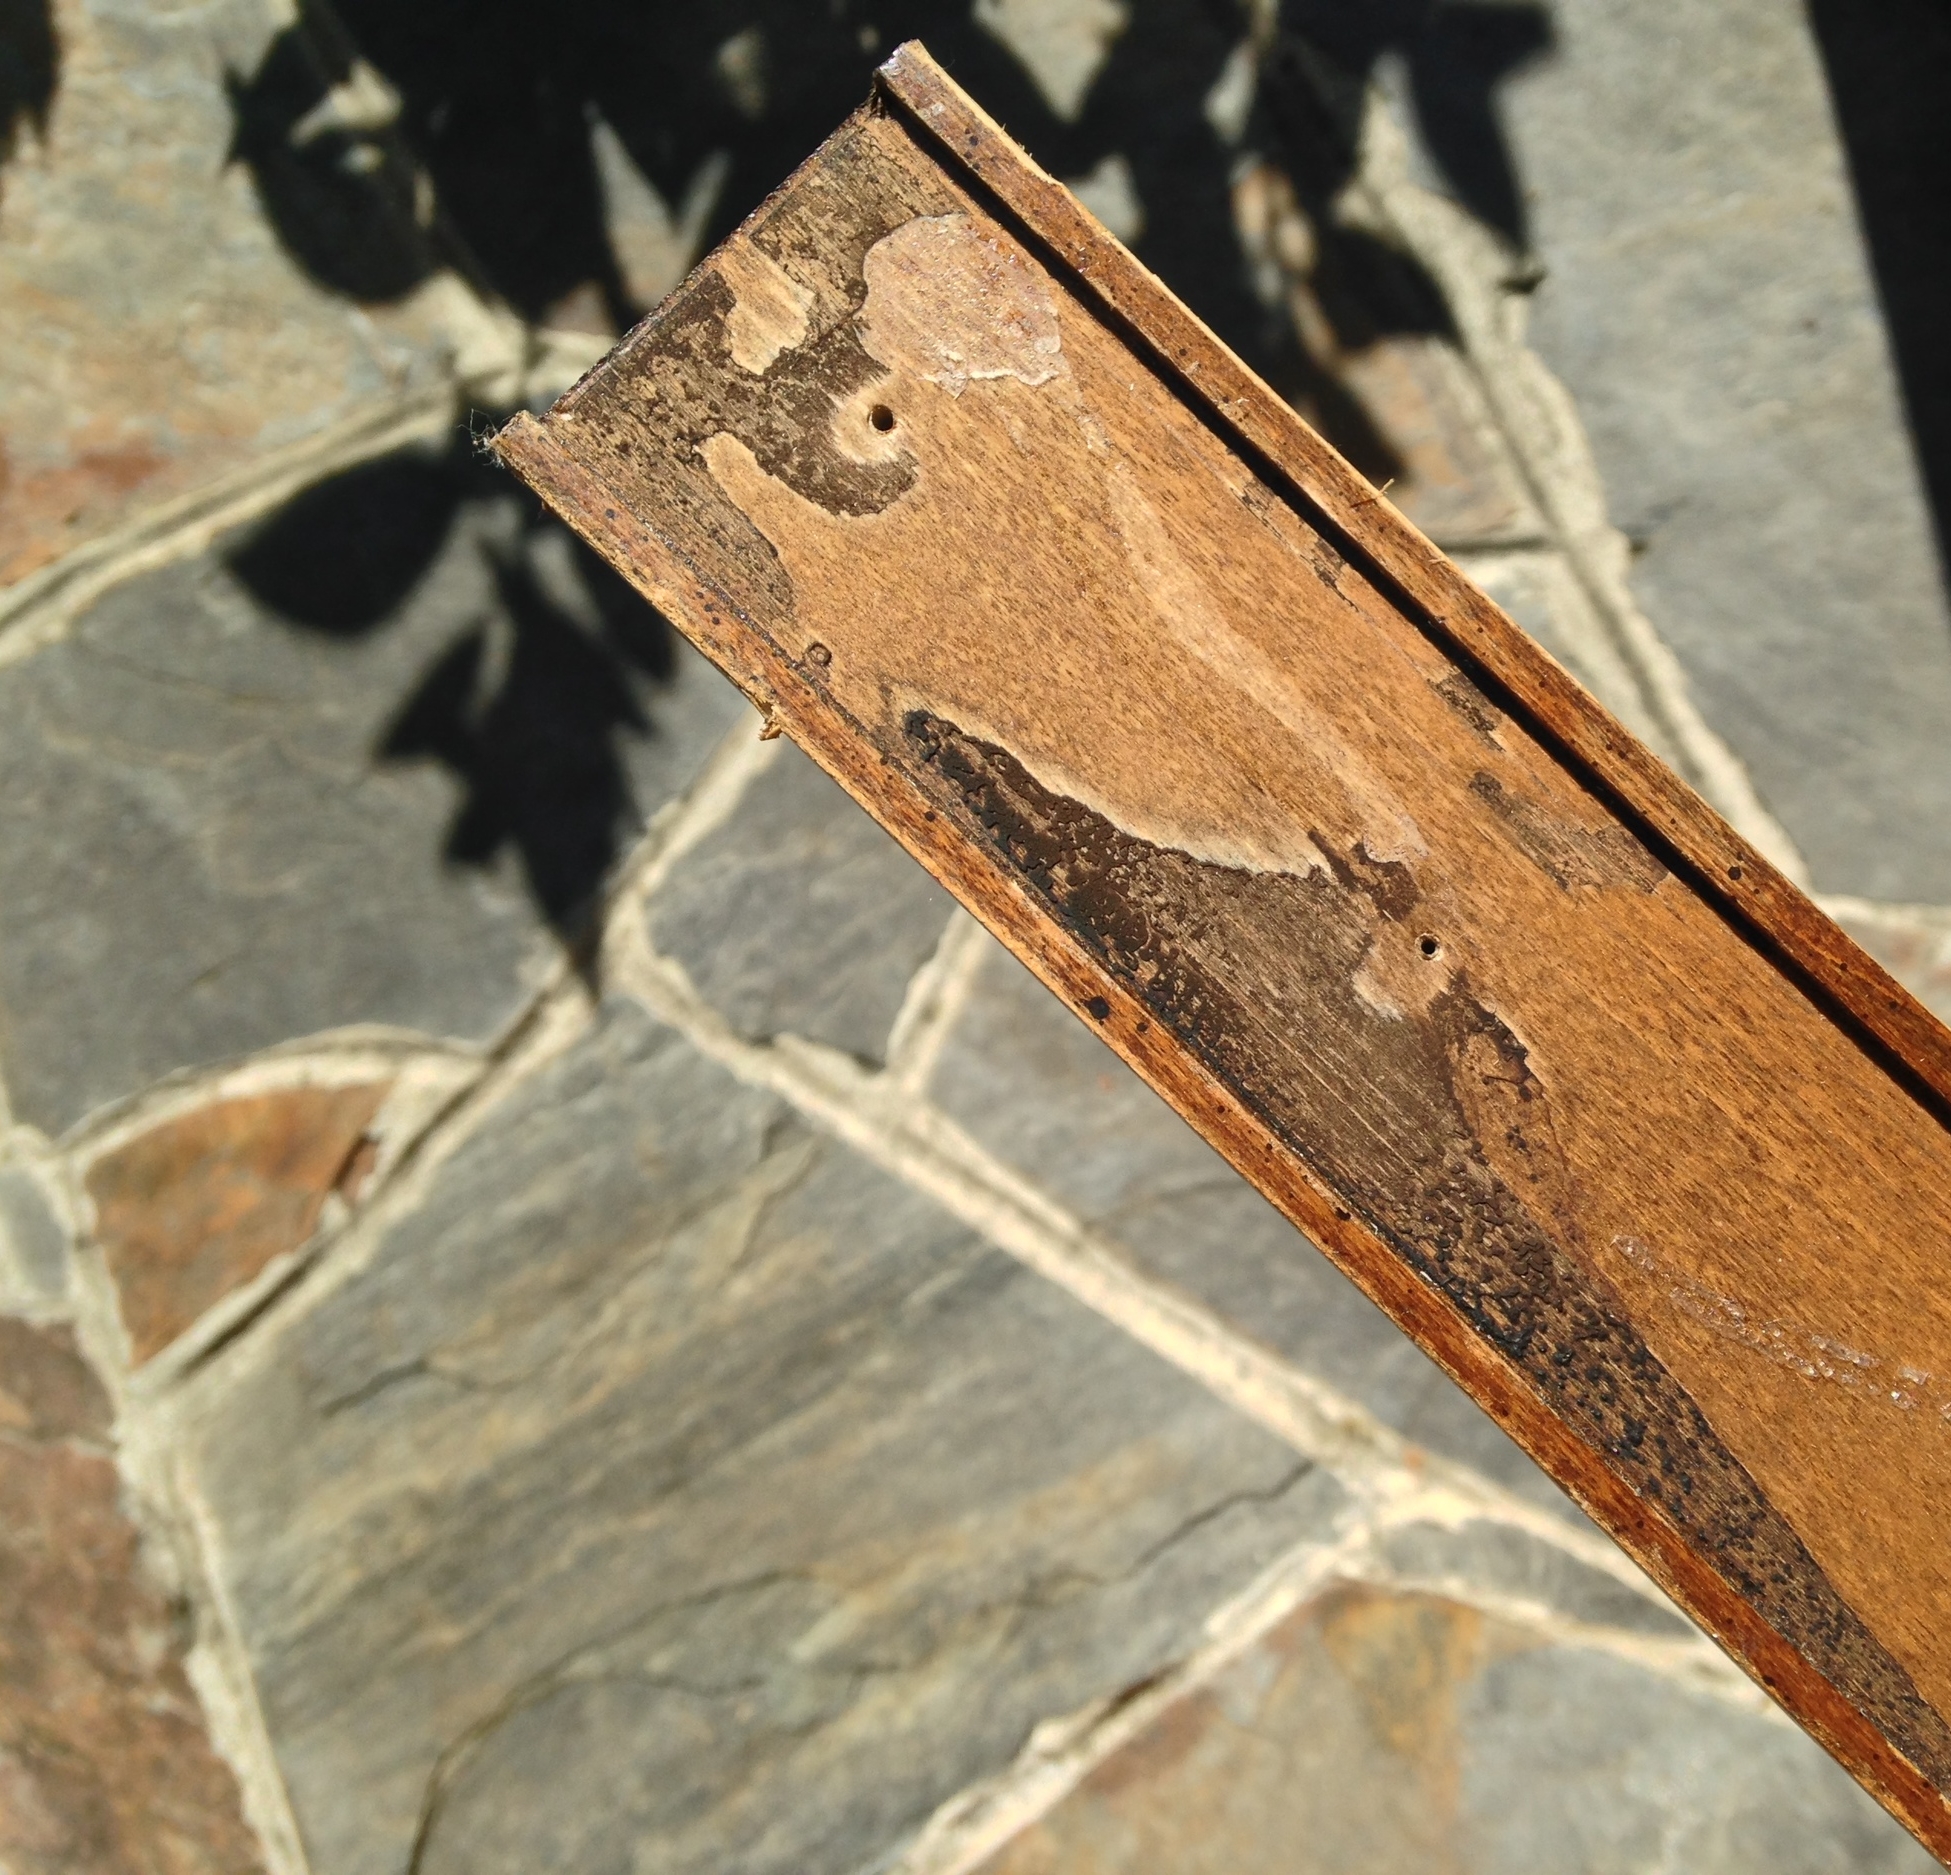
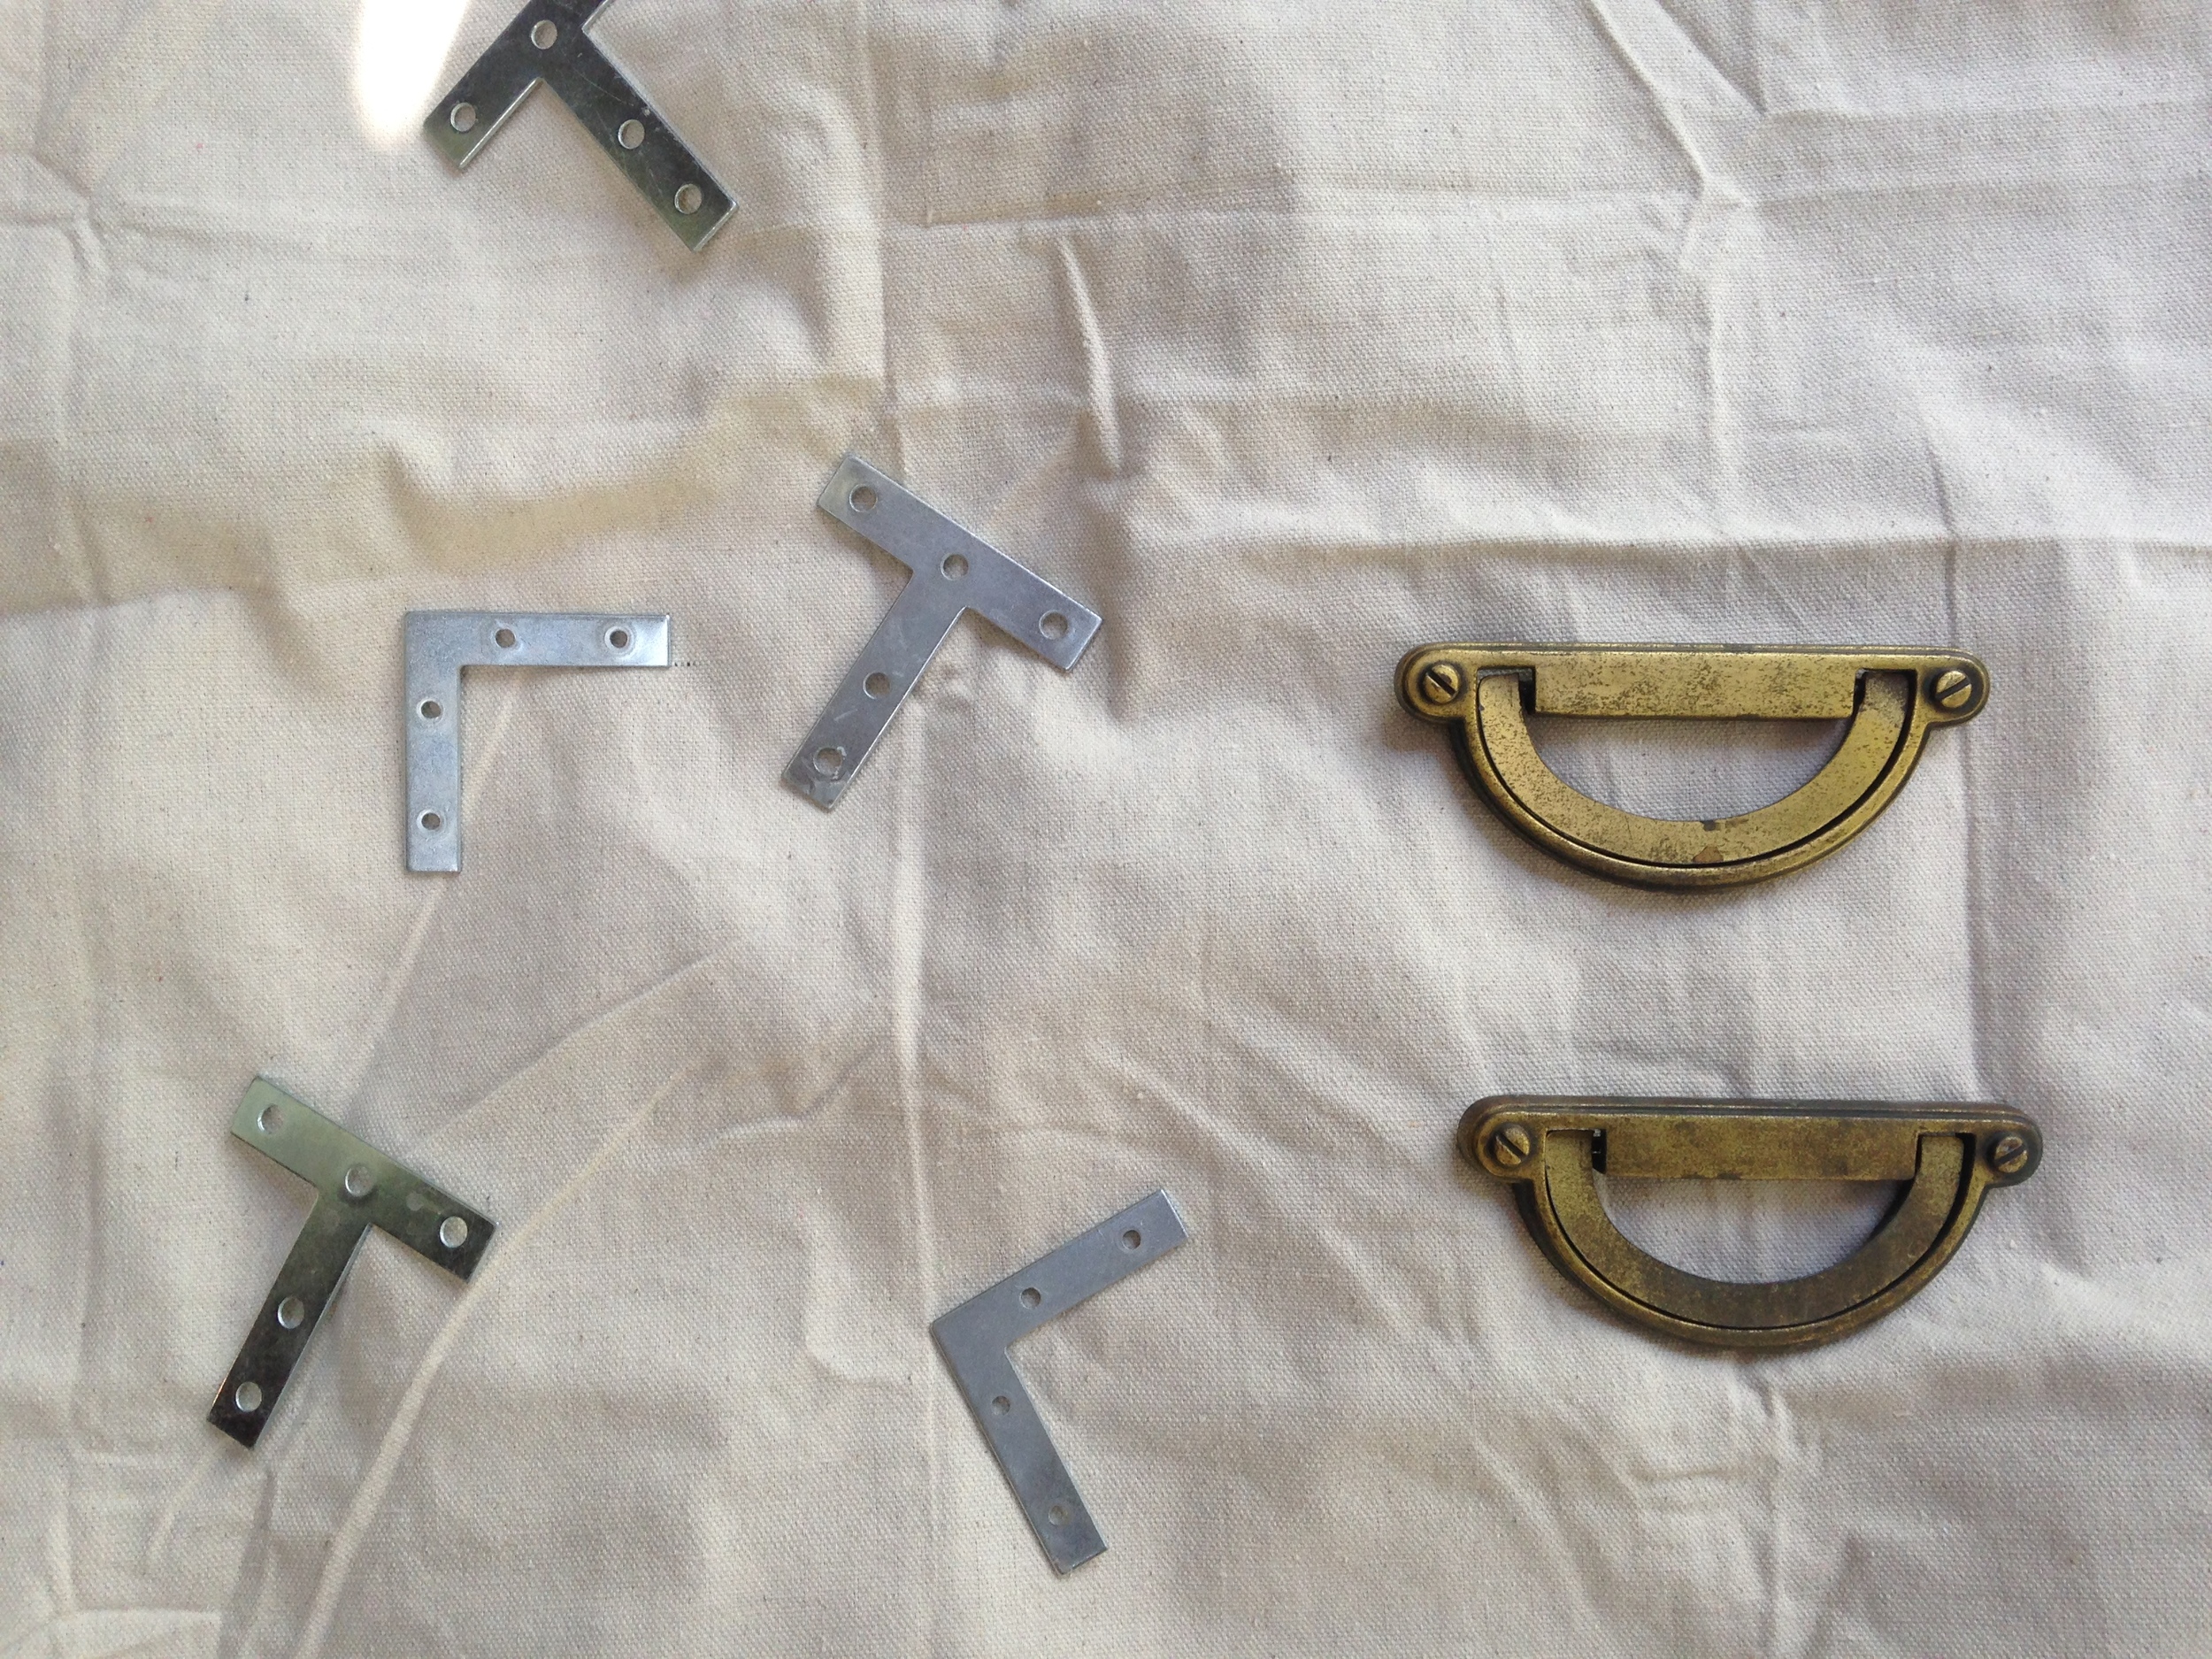
I was lucky to nab it indeed!  Although it wasn't a true campaign piece with flush recessed pulls and corner braces, I felt like it could still become one.  I decided the best route to go would be adding my own braces but first I would have to remove the brass plates and over-sized stuck-on faux bolts. Prying up the brass strips was easy, but shortly after I got them off my project stalled out: I didn't realize that the brass was recessed so deeply into the wood piece between the drawers and  I needed that piece to be flush in order to add T braces.  

I stayed stumped for a good long while.  I thought about replacing the two pieces of wood or filling the grove with a piece of wood veneer, but then I realized if I just flipped it around then I would have a flat surface to work with and wouldn't need to hunt down the perfectly sized replacement piece!

As you can see the recesses for the brass plates were quite pronounced.  But the other side was as smooth as a baby's bottom so I flipped them over and wood-glued them back in place. 

Then, I temporarily employed my T braces for some extra support while the glue dried for a few days.

I sanded the piece down and primed the flipped wood pieces to prep for paint.  I chose a quart of Compass Blue by Behr Marquee and was DELIGHTED with the quality.  The wet paint settled well without any paint strokes and the eggshell finish was just the right buttery texture I had wanted from my inspiration photo. I hardly need two coats so I have lots of paint left over to play with.

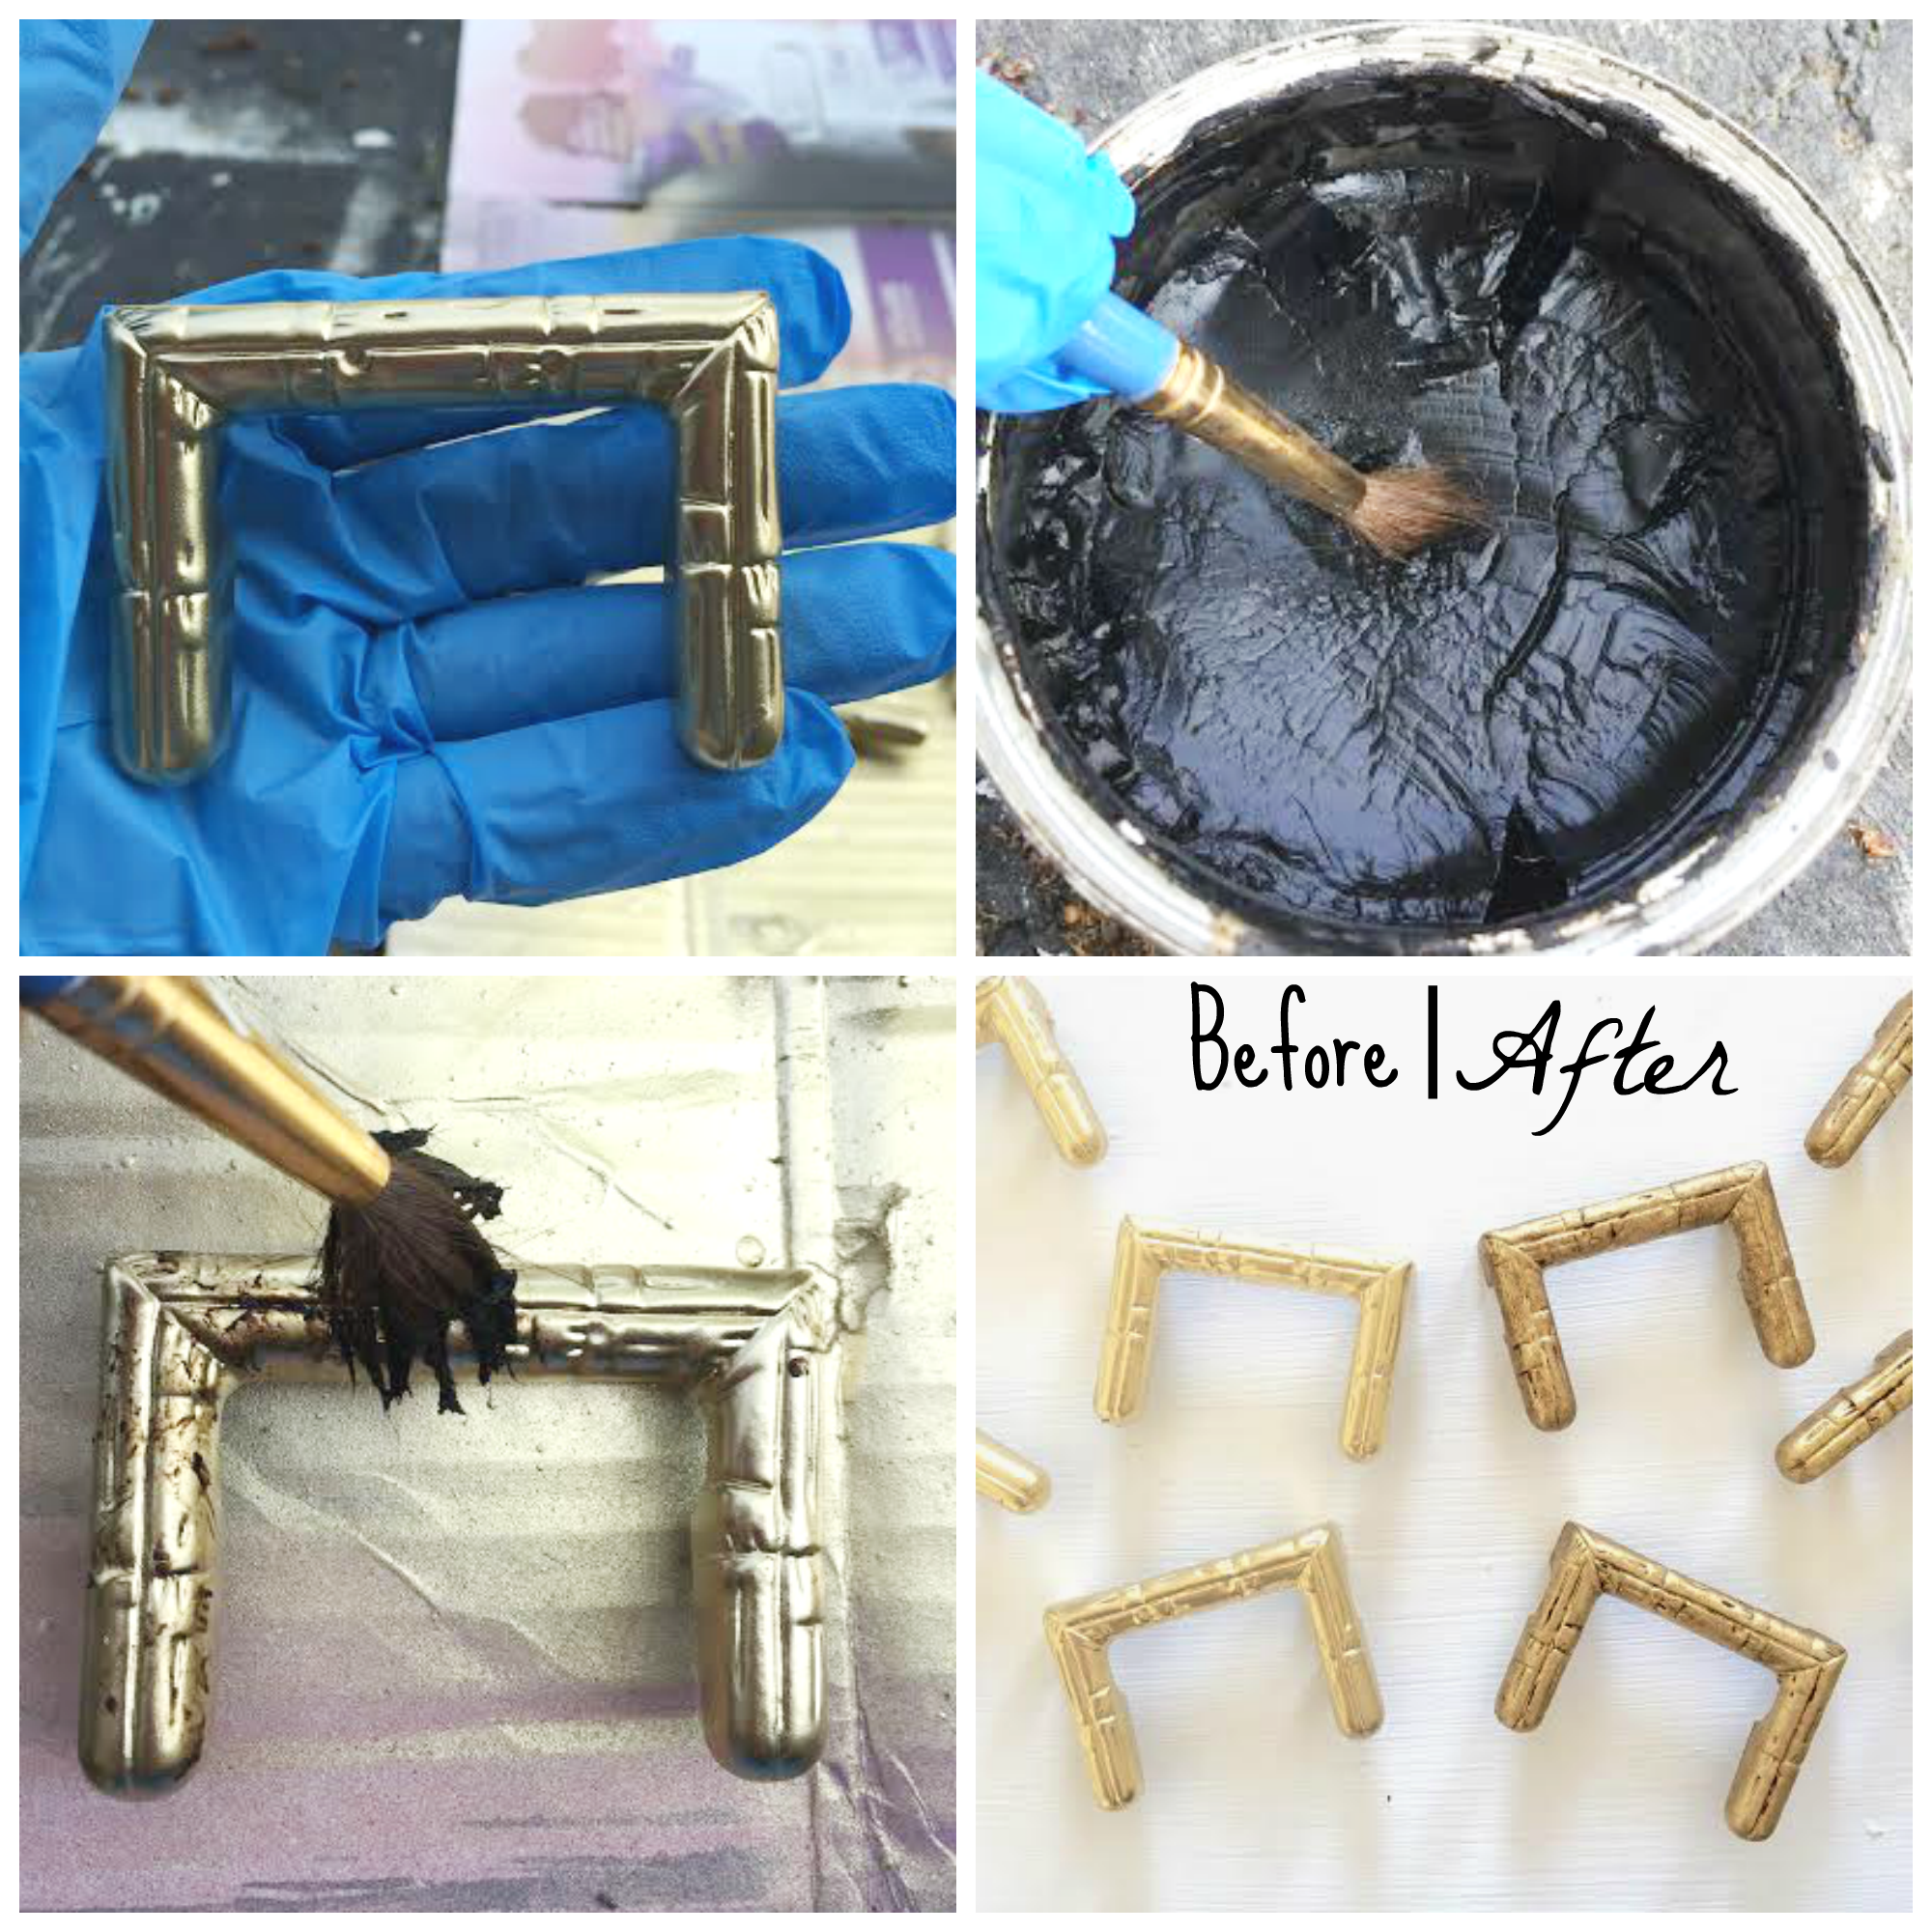
The flat corner and T braces I found in the hardware aisle at Home Depot but their zinc finish did not match the original aged brass pulls.  Cue my next challenge. 

I was going to have to refinish the hardware and still get an rich antiqued finish.  First I primed the braces with flat black spray paint. This will 1) help the next layer of paint adhere to the metal and 2) create the first layer of dimension to the gold finish.  Once the black dried, I applied the second layer of dimension: the gold.  But since the shade of gold wasn't quite "brassy" enough to match the original pulls, I had to give the original pulls a fresh coat of gold so all the hardware would have the same shade.

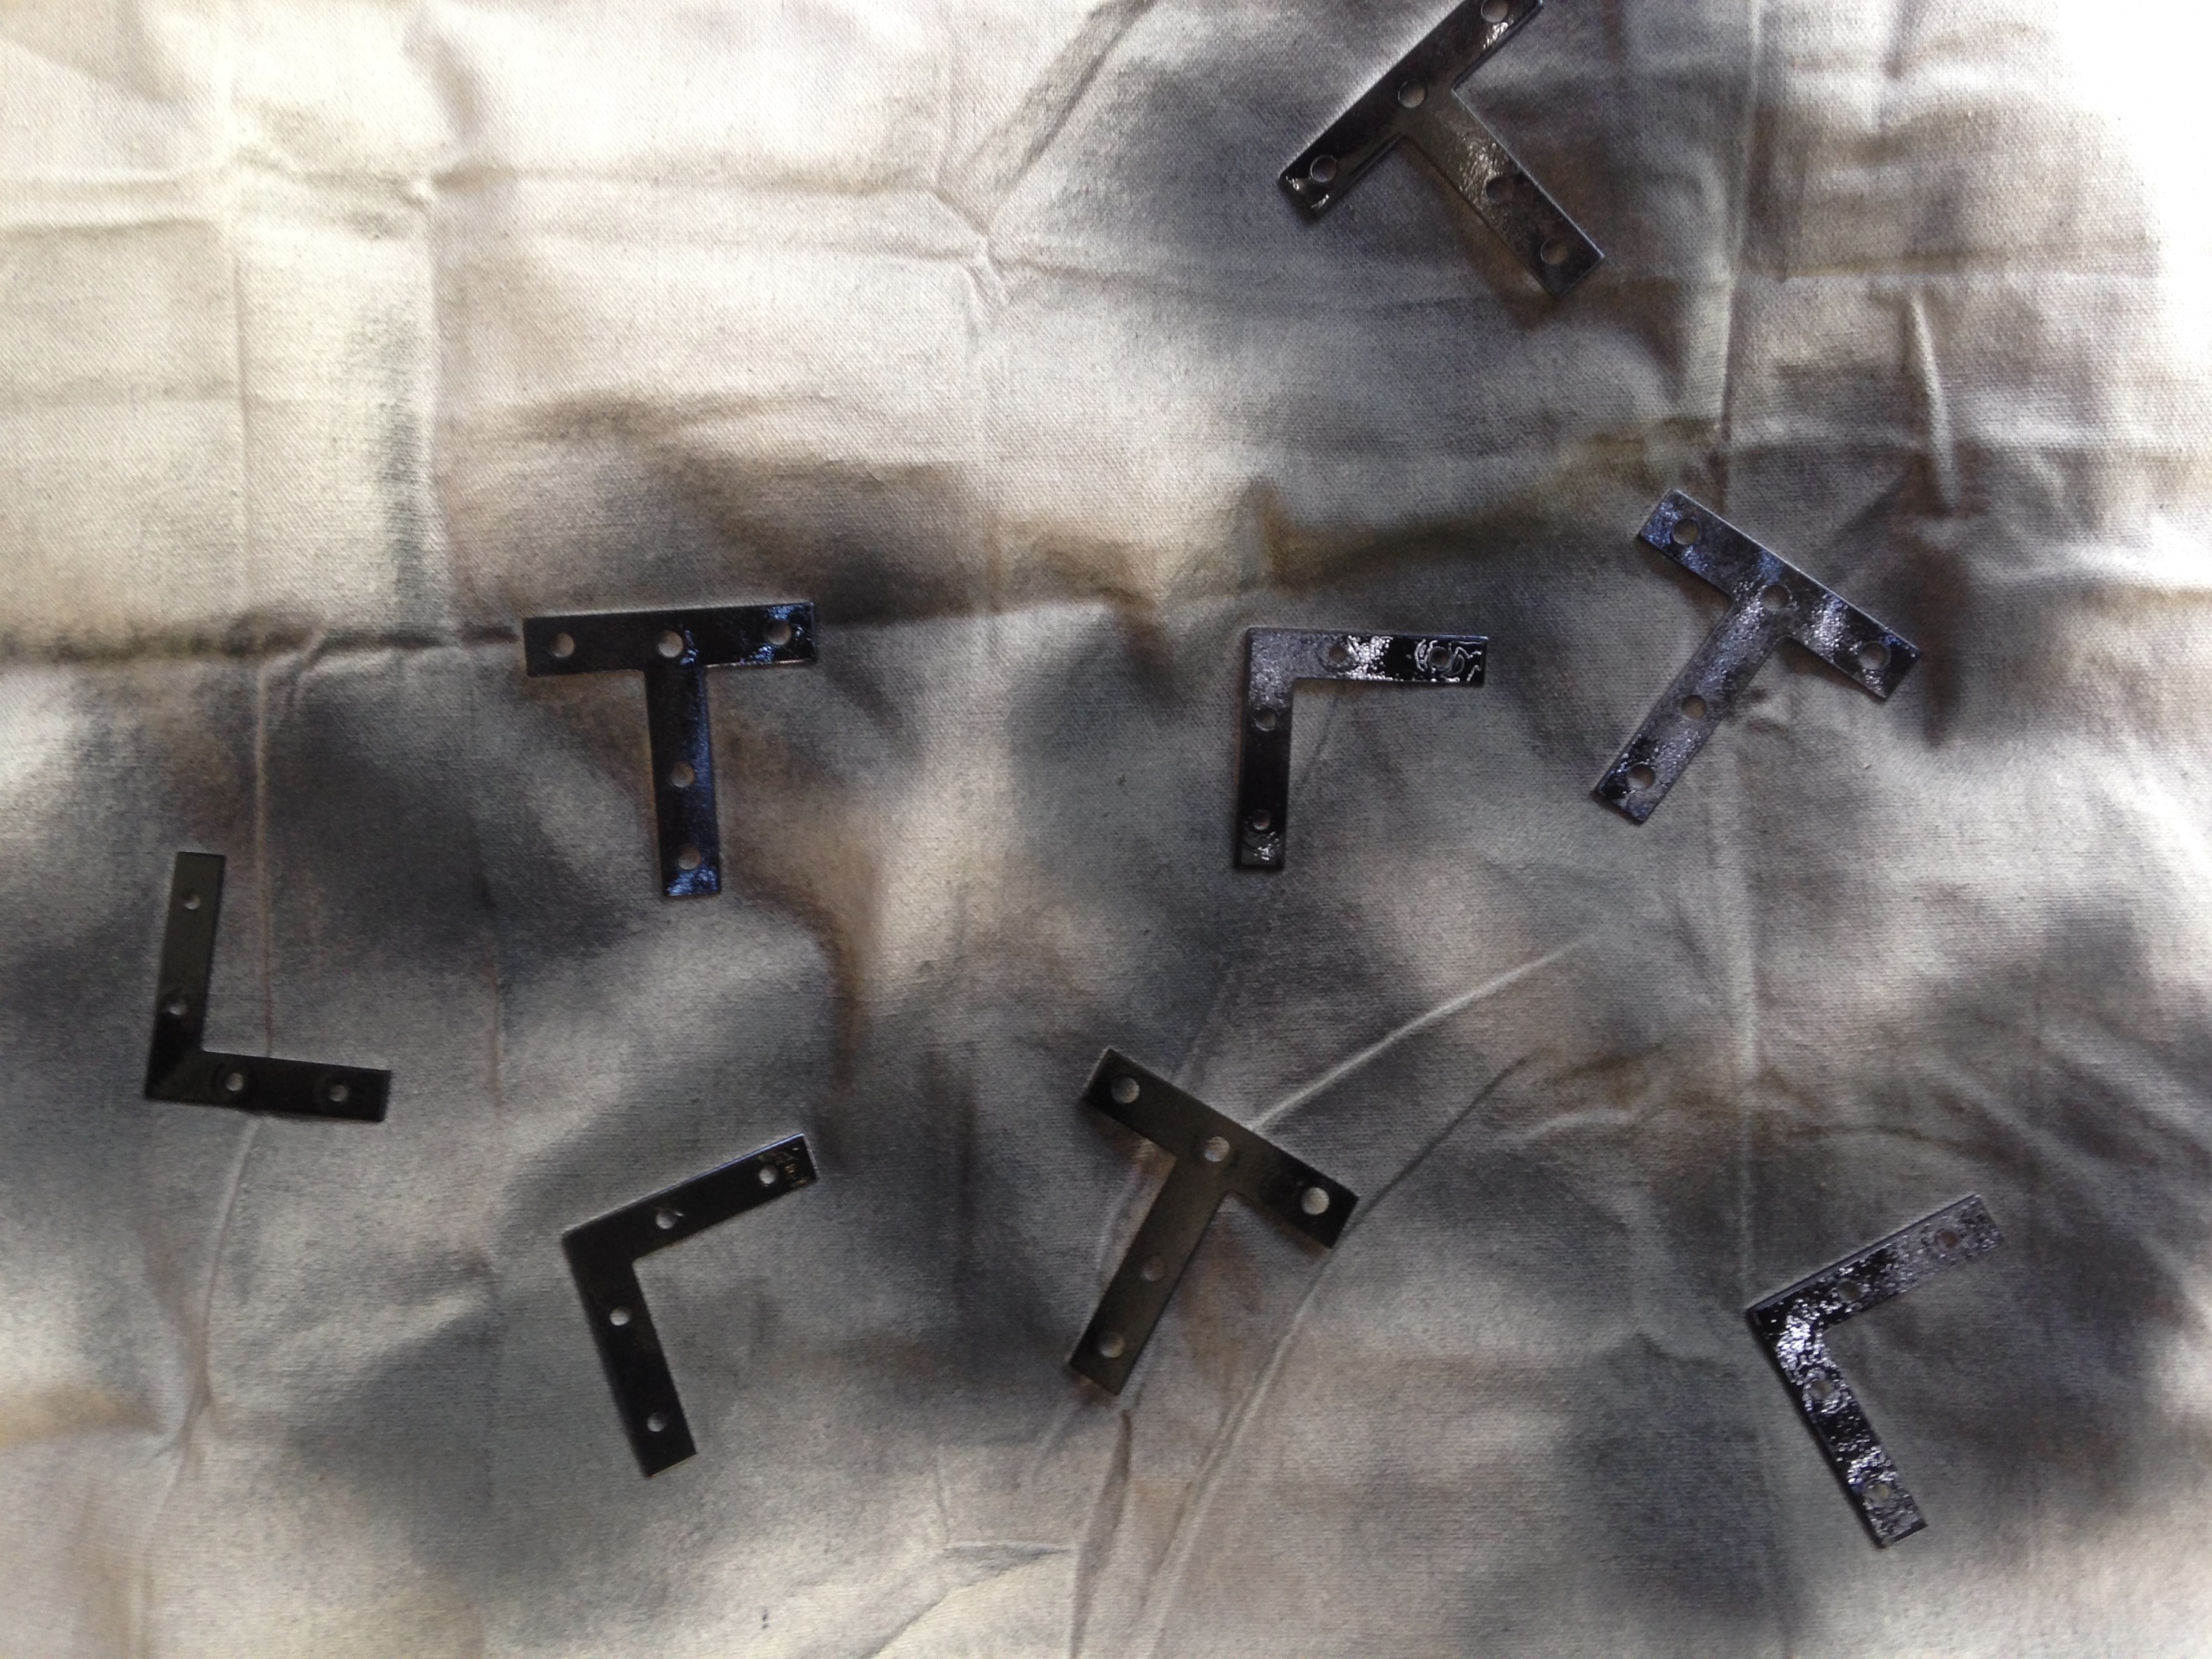
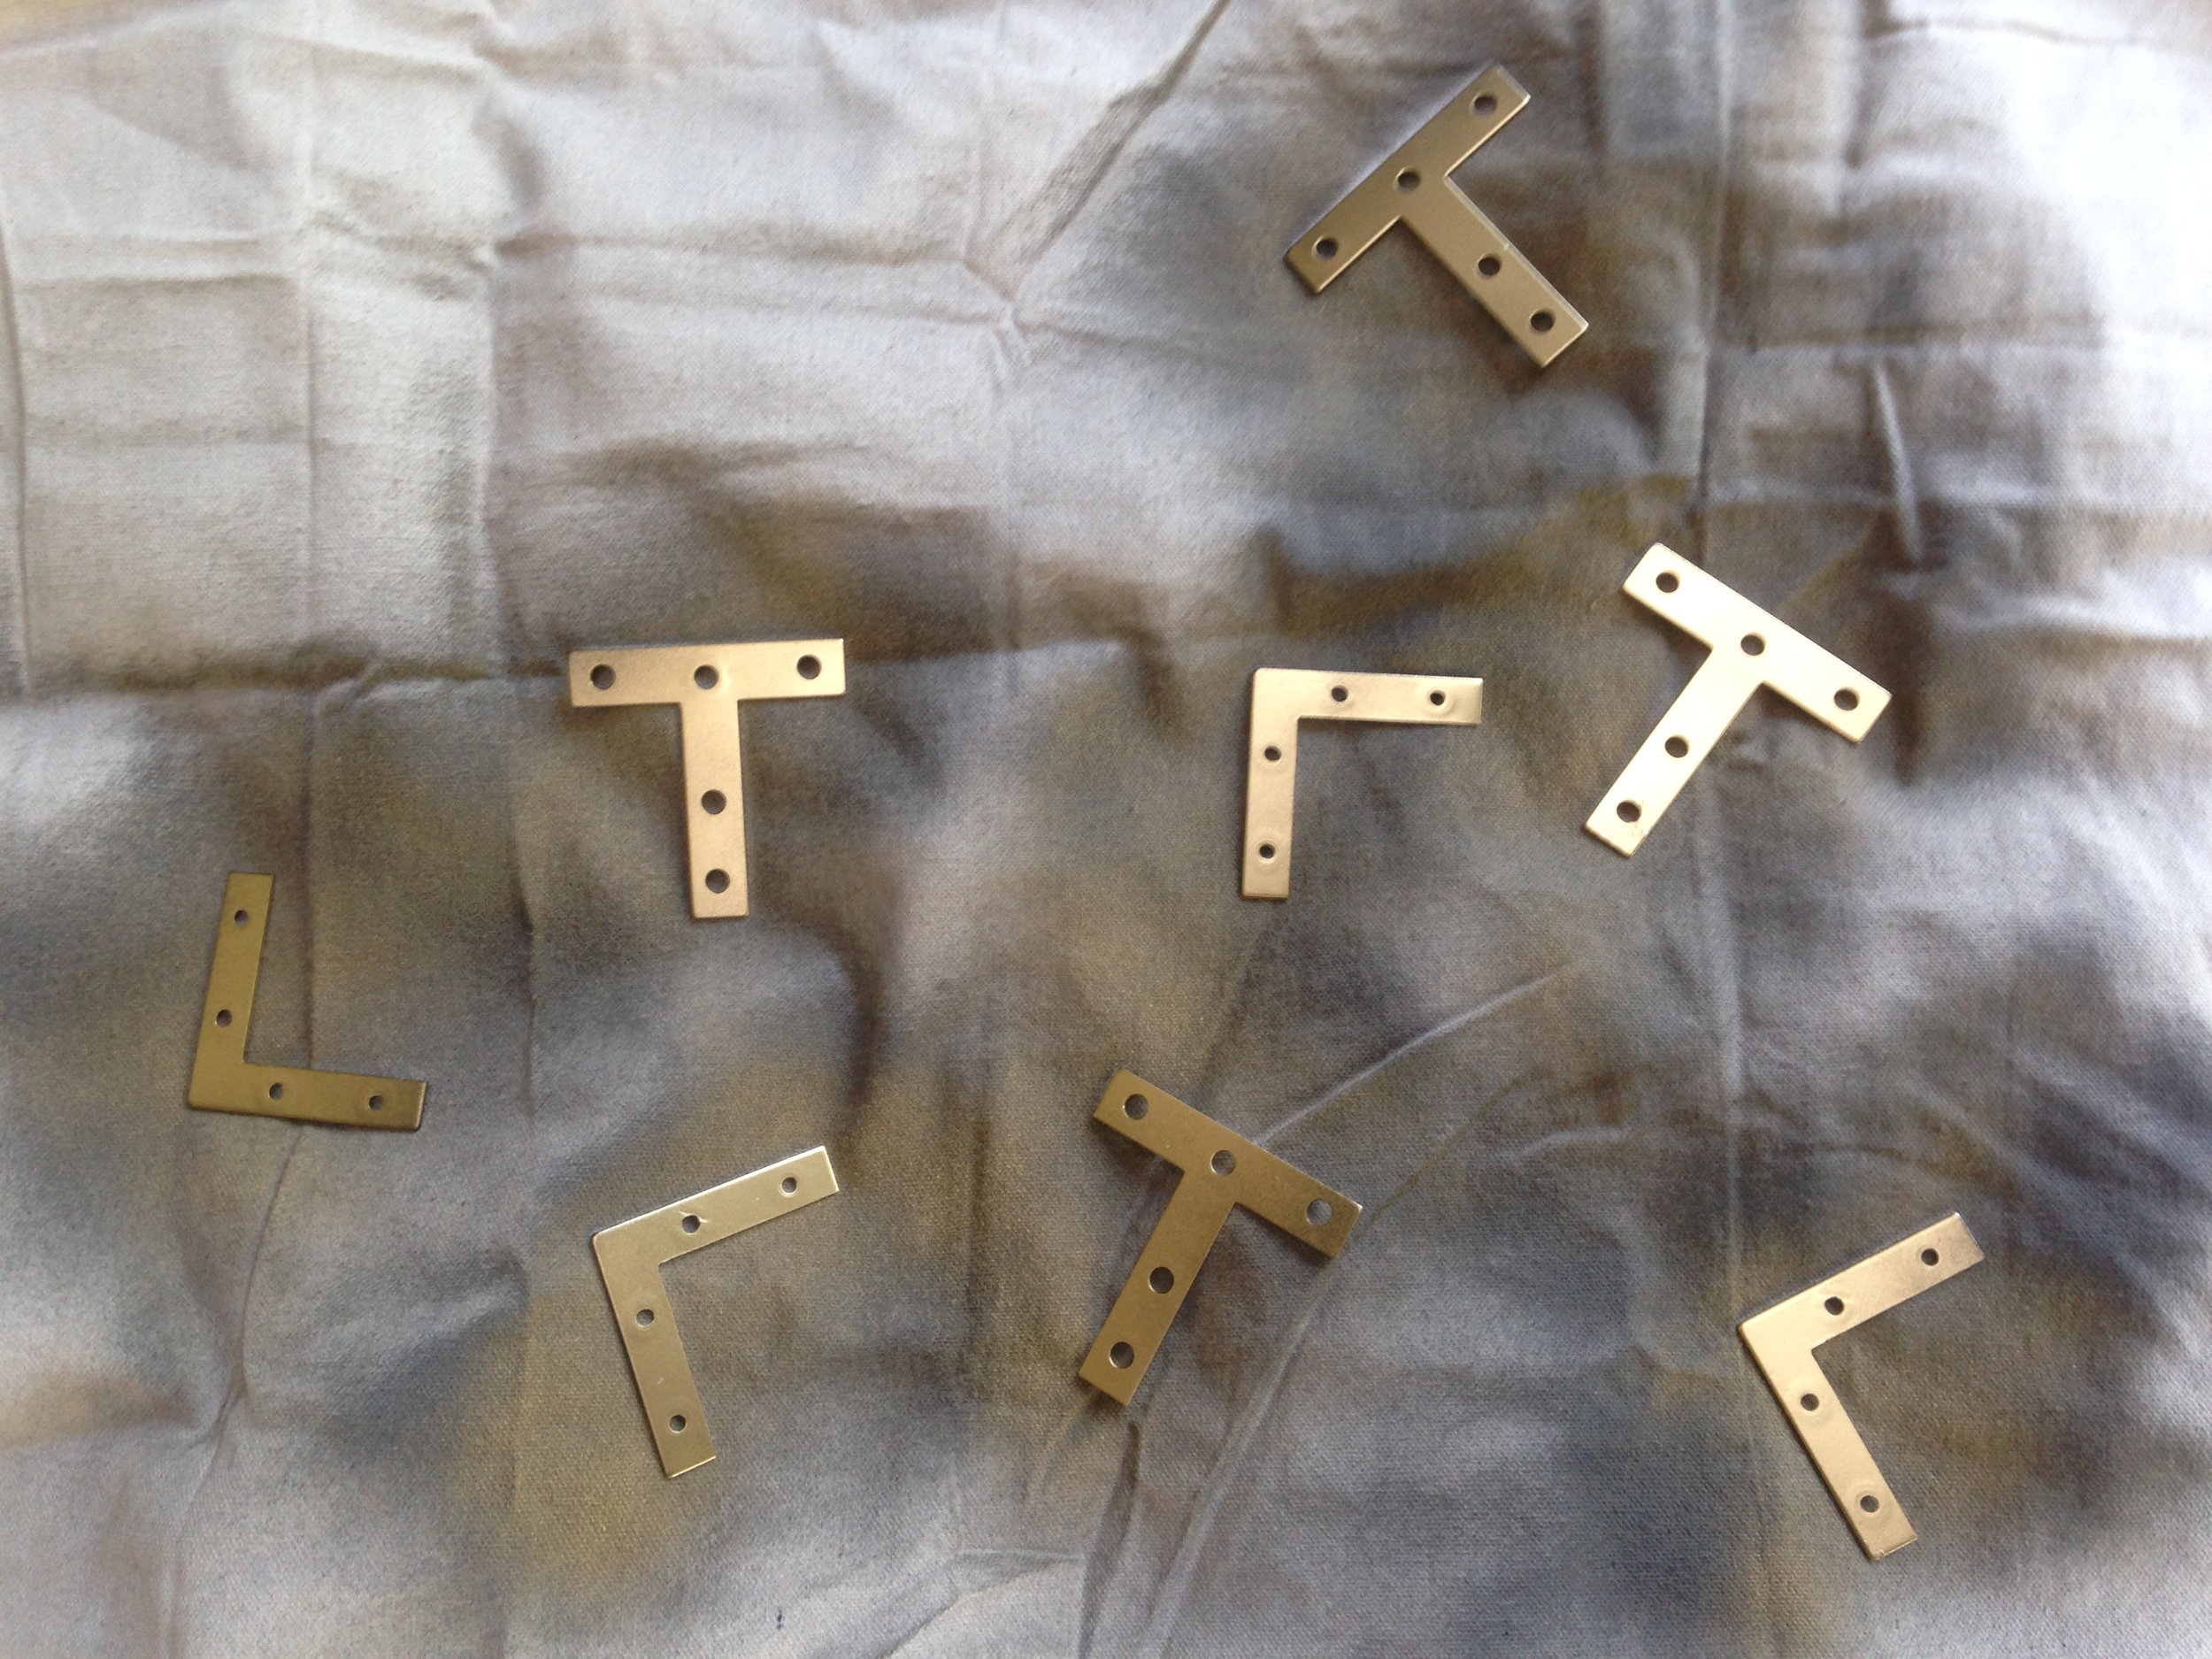
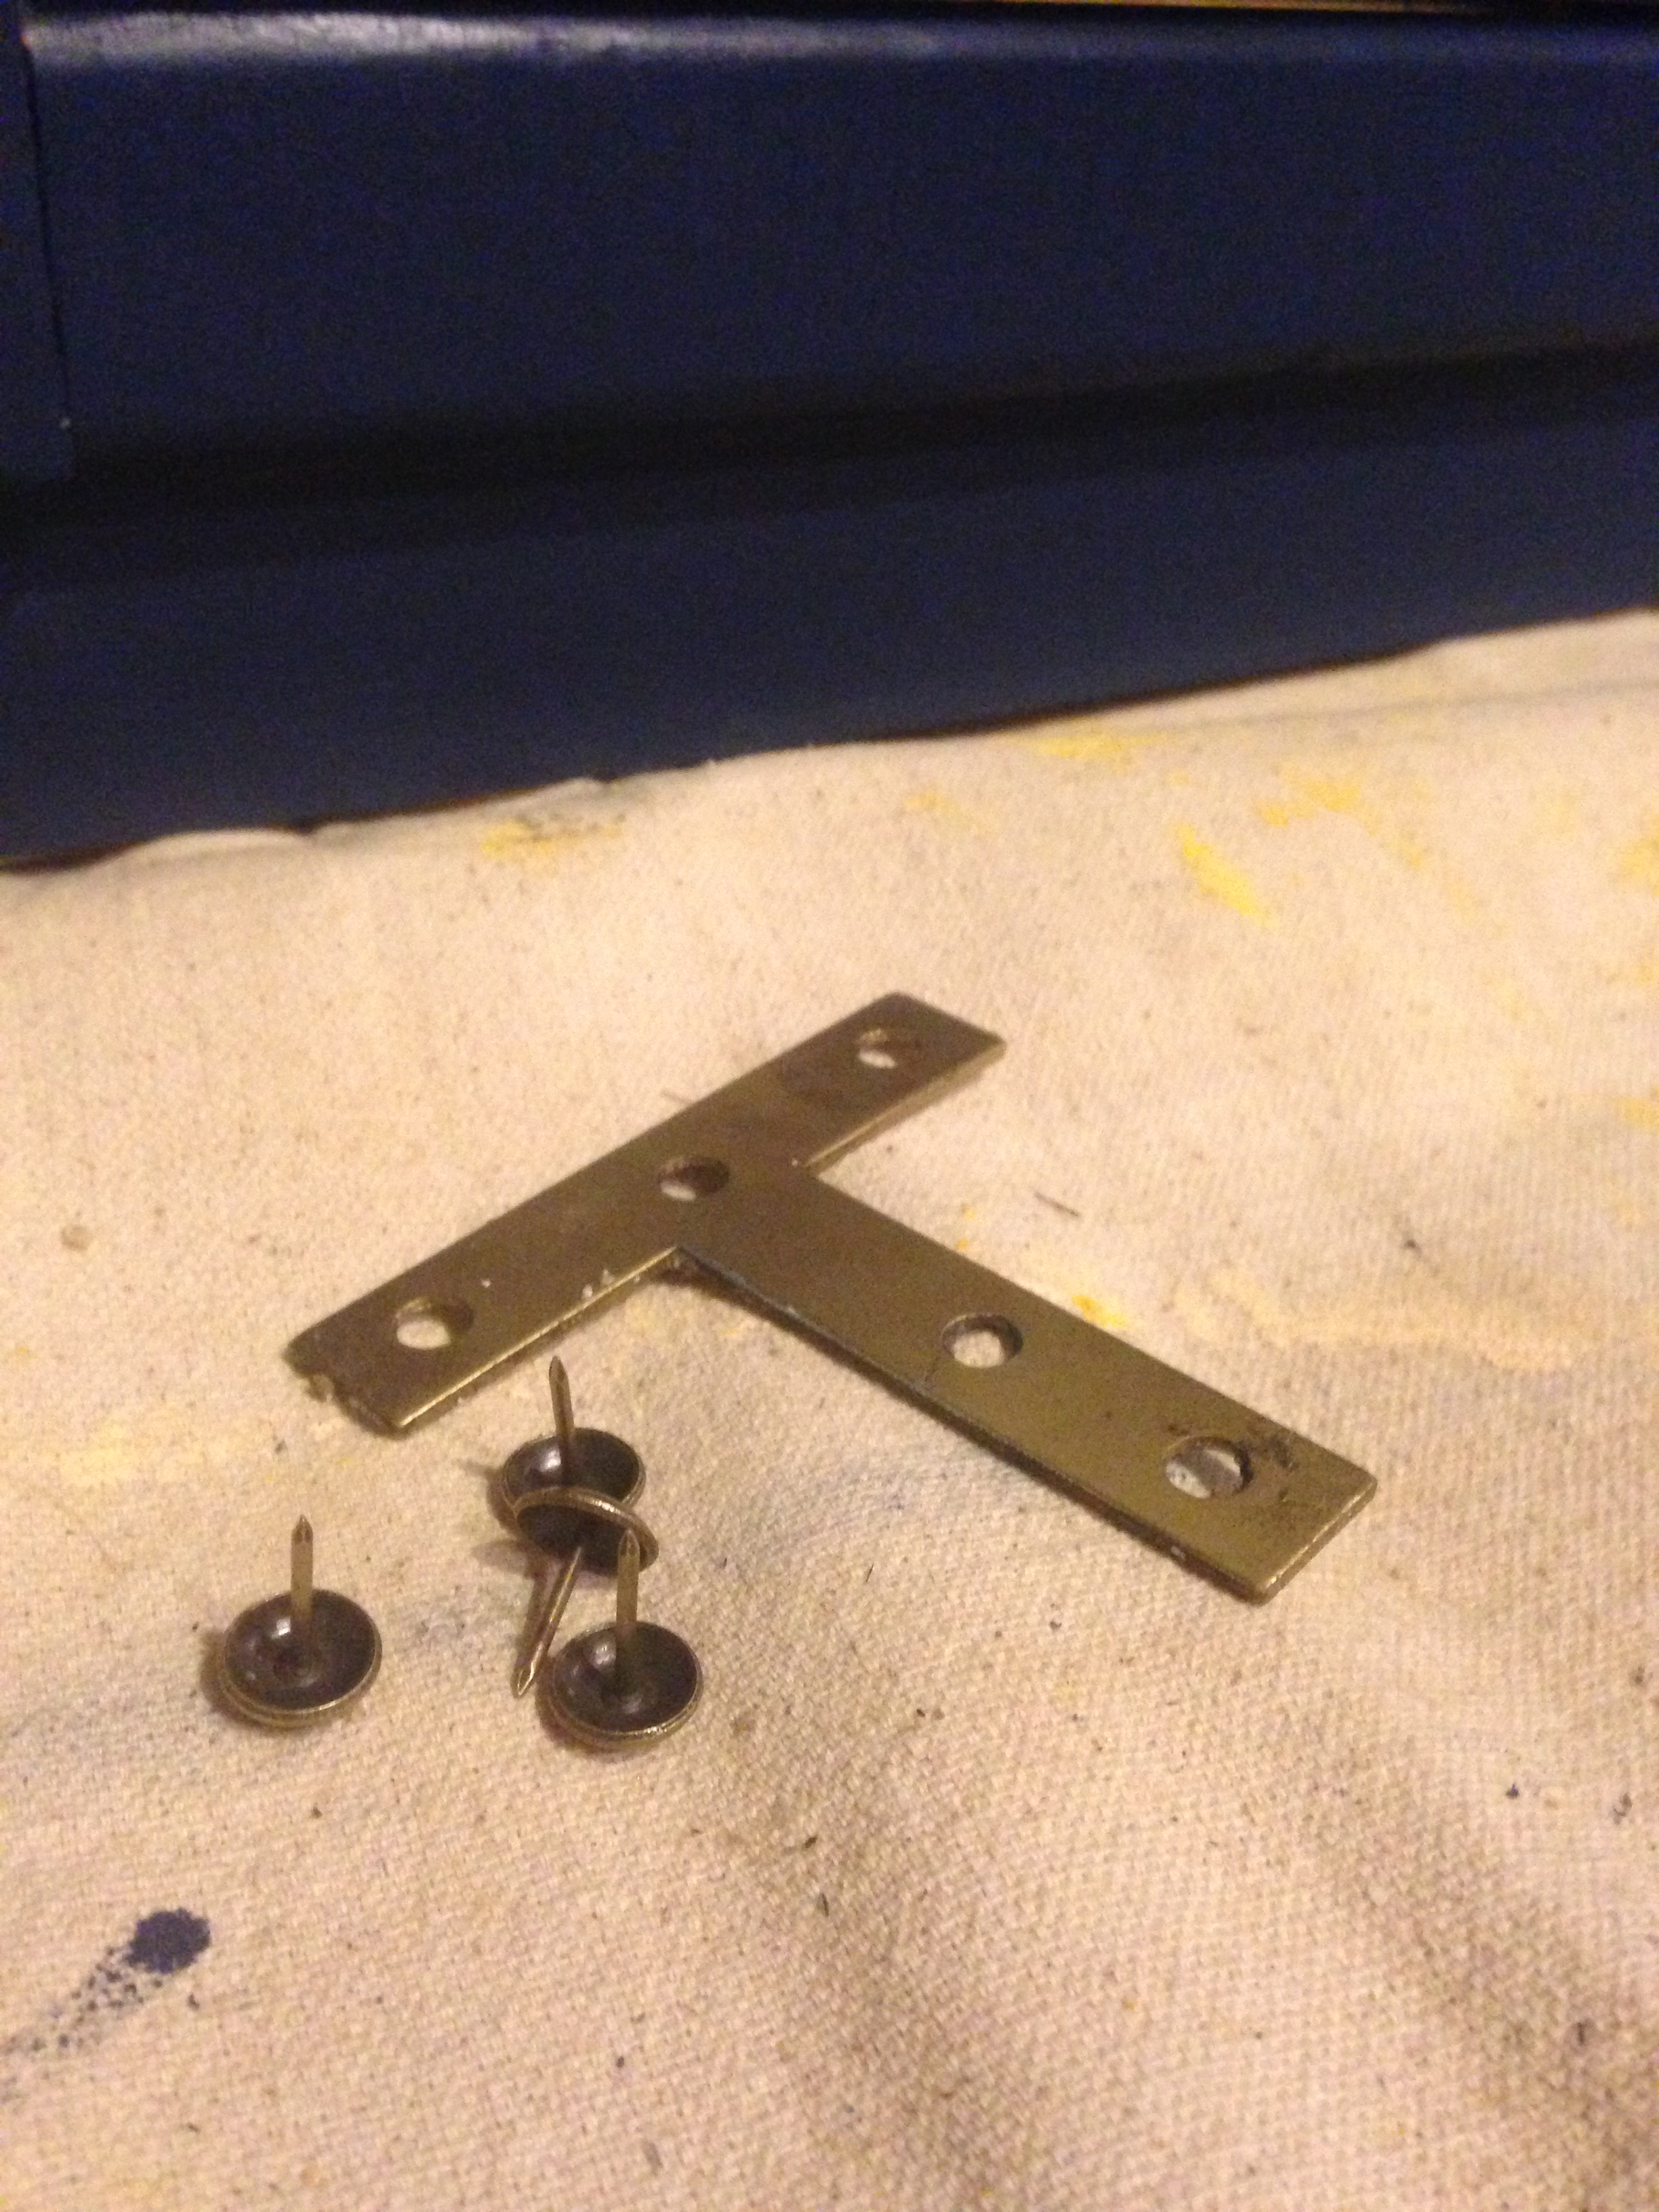
Then I lightly sprayed both braces and pull again with a little bit of black for the third layer of dimension.  The faint black over-spray gives more of an aged finish and is the third layer of dimension.  The fourth and final layer is to rub each piece down with some dark wax. Then using some aged brass upholstery tacks, I nailed the freshly painted braces into place.

Voila!  A match made in hardware heaven!

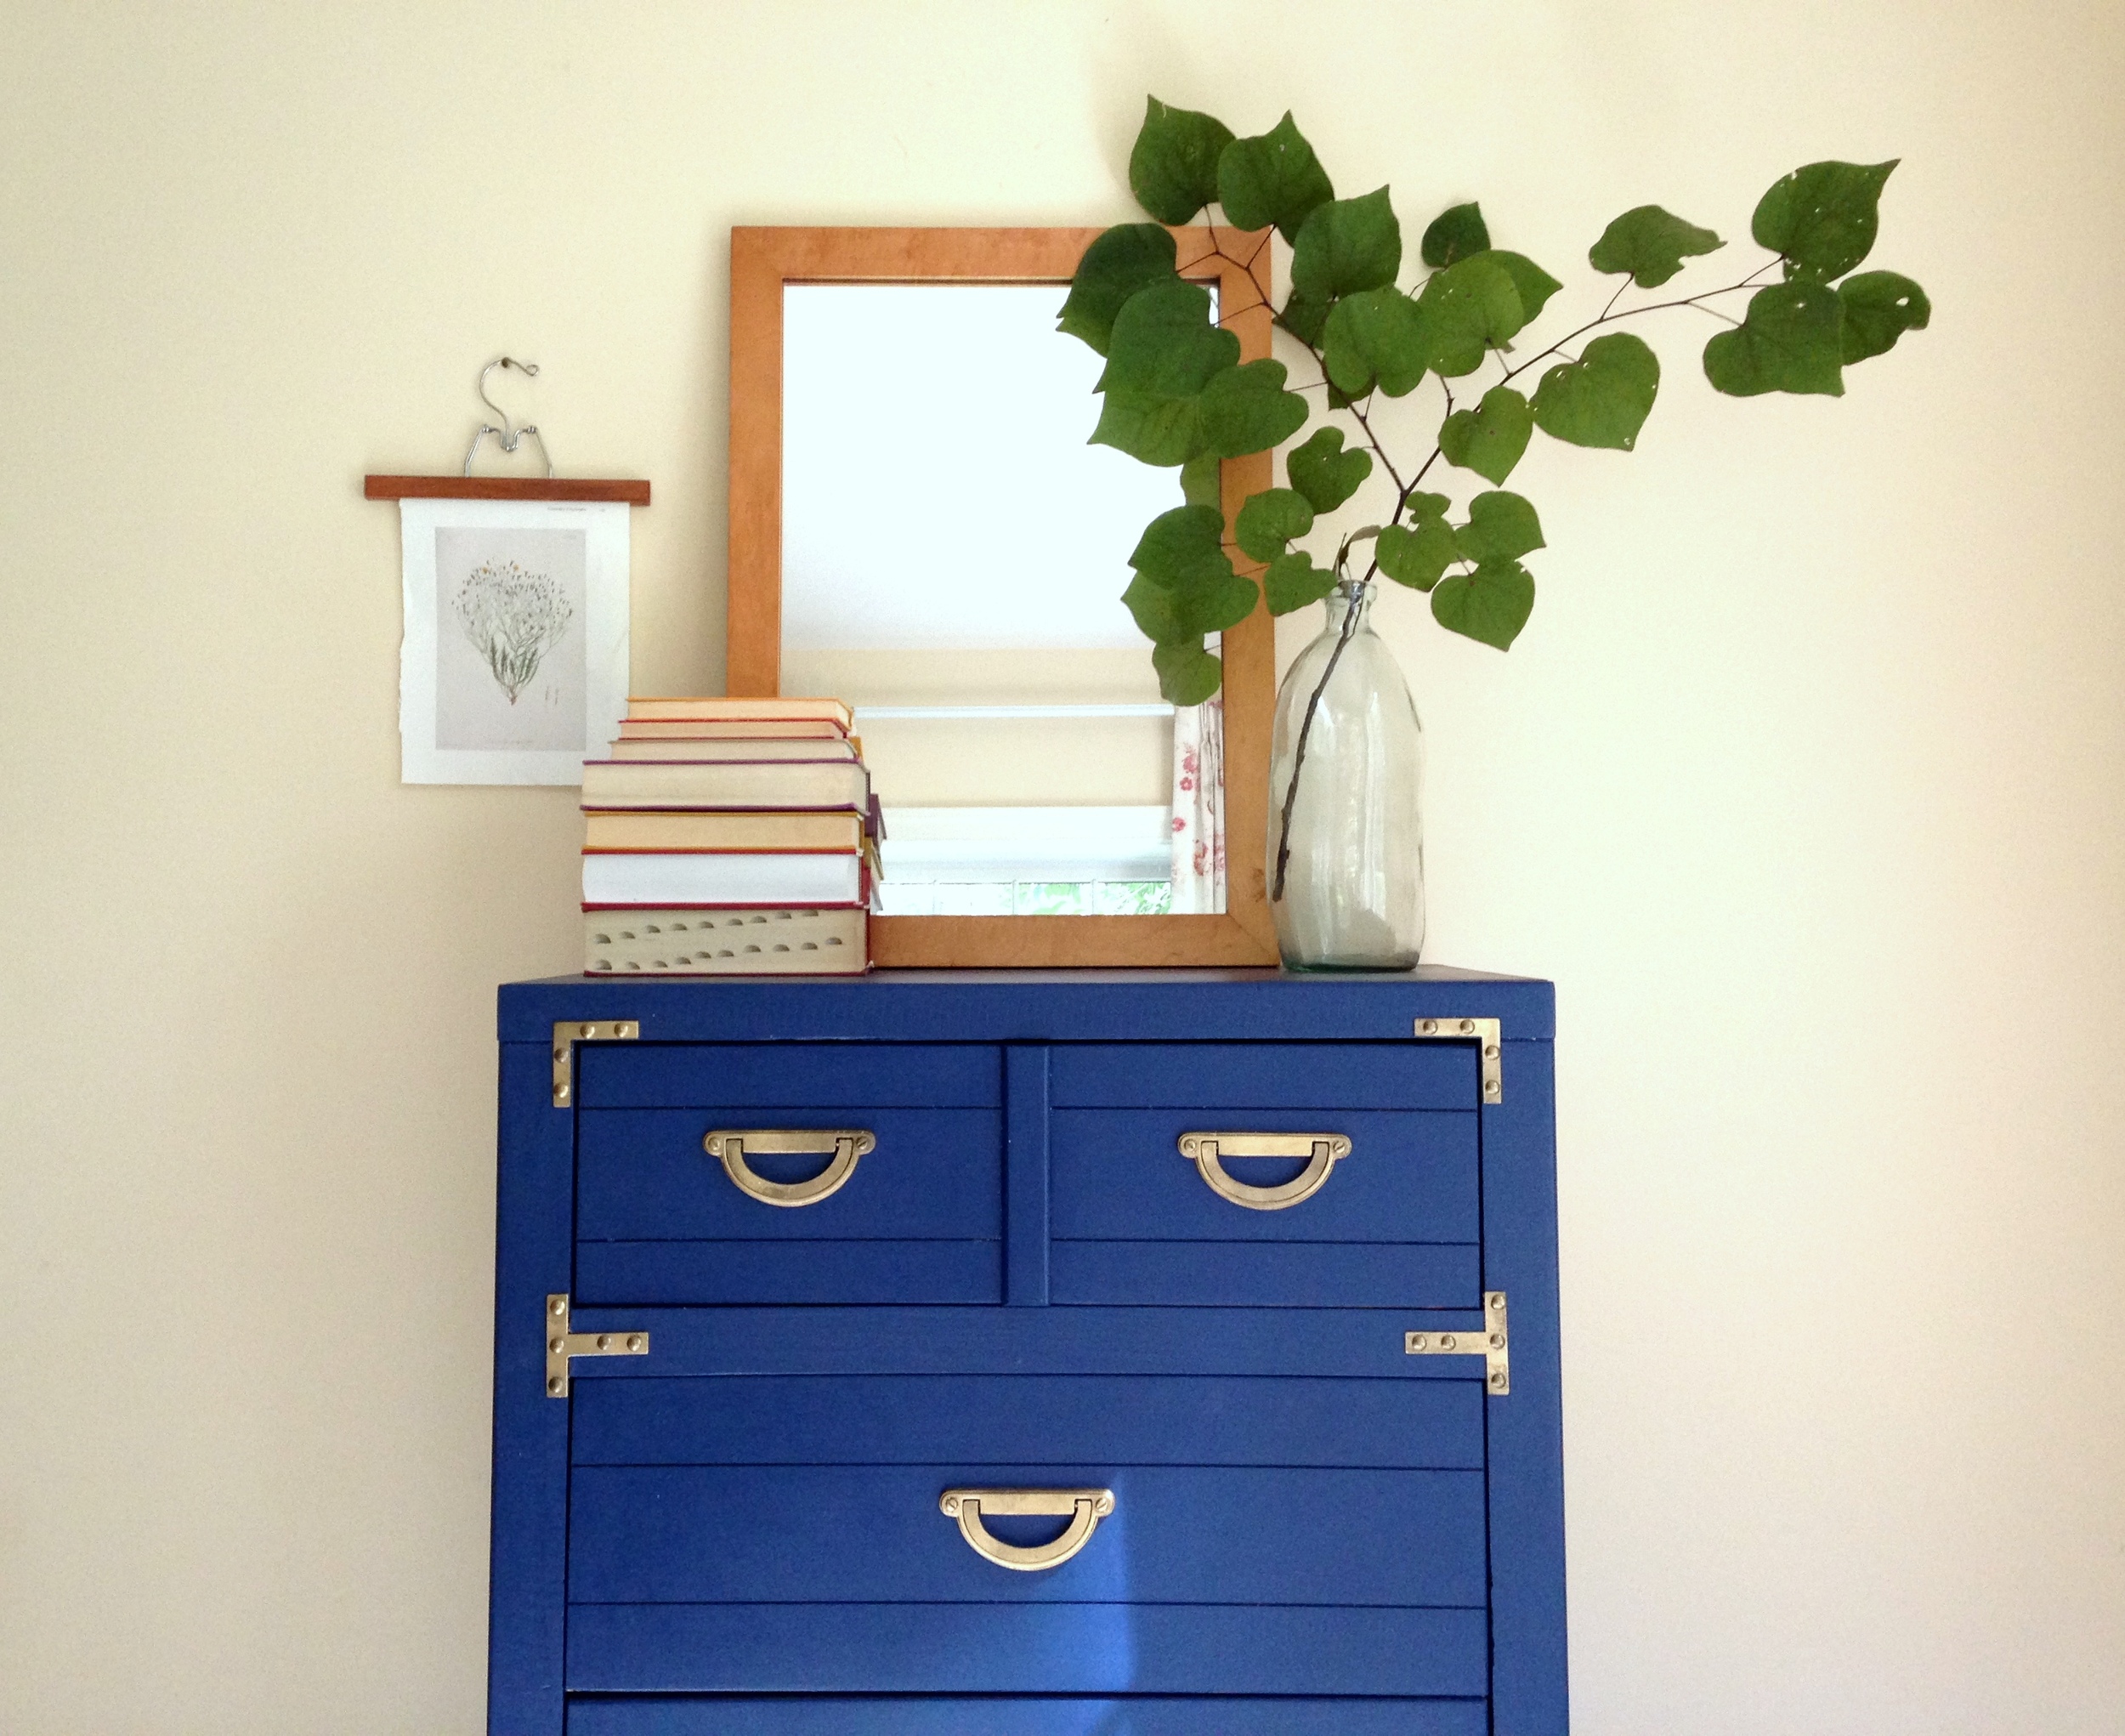
This bad boy is now in the garage shop!

Navy Campaign Dresser
32"W x 18"D x 44.5"H
$345 SOLD

If you are interested in this piece or a custom order like it, please contact cate@stylemutthome.com.

Before + After ||Warning: Graphic transformation details ahead||

Guys. (well, mostly gals). When I saw this piece on Craigslist recently I tried to do a handspring and almost twisted my ankle. No joke. That's how much I loved it, had to have it, wanted it yesterday.

Please note that is NOT my garage, it's the seller's pic. Not that I have any right to pass judgement on a messy garage... Anywho, pretty epic piece, right?!

And after some TLC and socialization with the world outside of a garage, here's our beauty after!

This makeover had it's highs and lows and I'm not going to spare you any graphic details. Consider that fair warning!

To start, I texted my go-to-gal, Cate, and shared an up close pic of this piece's freckled veneer. That is, indeed, veneer - but it's in SUCH amazing condition that I knew it could stand its own. However, it had freckles! It looked like my arms and legs in July - COVERED in freckles! Fine on people, not furniture. Cate suggested dulling the freckles by rubbing the piece down with a gel stain, and it worked!! 

That Cate; she's one brilliant chick! Love running things by her for her opinion and advice. She never fails. Seriously, I think she's batting 1,000 - every pitch I throw she swings a home run idea!

After I stained the body, I was ready to tackle the shelves and cabinet door. I wanted glossy white but was really not interested in using my highly praised Glidden Trim Door Furniture paint. I love that stuff but it's seriously thick, and trying to get it inside every corner and crevice was going to take a lot longer than I have patience or time for. So I tried this:

Gave all drawers and door a coat of Rust-Oleum Paint & Primer In One. Worked beautifully as a solid first coat.

Here comes my favorite part - I tried for the first time Rust-Oleum's Gloss Protective Enamel, (in white), and it's like the SPRAY FORM of my beloved Glidden paint! It's oil based, sprays even and lays thick. When all pieces were dry, they were so smooth and solid - you couldn't scratch if you tried.

Luckilly, I had an opportunity to test this most amazing paint after this happened:

Some bird out there is patting the feathers on his back for this near bullseye. Don't set pieces out to dry under a large tree, folks. Lesson SO learned! To clean, I ran a high pressure hose over this while simultaneously scrubbing with a thick bristle brush. I figured I would have to start from scratch and re-spray this piece. What a pleasant surprise when the water just beaded up and trickled right off and the bristles made absolutely no damage to the finish at all! I am so pleased to say it is now squeaky clean and Rust-Oleum has made me a die-hard fan for life! Amazing product, Rust-Oleum; bravo!

Last to tackle was the awesome custom hardware. This piece would have no other hardware. There are wooden 'notches' made just for these pulls to fit around, so it's already a perfect marriage. They were pretty dirty and dingy, so I cleaned them up and gave them all a coat of Rust-Oleum metallic gold spray paint. They looked a little plastic-y afterwards, though. So, I grabbed a can of dark wax, (by Annie Sloan, but you can find dark wax in most hardware stores now), dragged a thick artists brush around in the wax, and dabbed it into the crevices on the hardware. I covered each piece thoroughly, then took a paper towel and just 'blotted' to remove any excess wax. I let the wax cure for a day before adding the hardware back on the piece

Love the authentic look that the wax adds! Beautiful, isn't it!

Cleaned up nice didn't it. ;)

twotone13.jpg

So excited with how this piece turned out - it made a marvelous journey with a little crap along the way, but all the best journeys have their fair share now don't they.

This pieces is now available for sale in the DC metro area!
$675
69"L x 30"H x 17.75"D
You can email me at chelsea@stylemutthome.com if you have any questions or want to snag it!

Thank you all for stopping by!